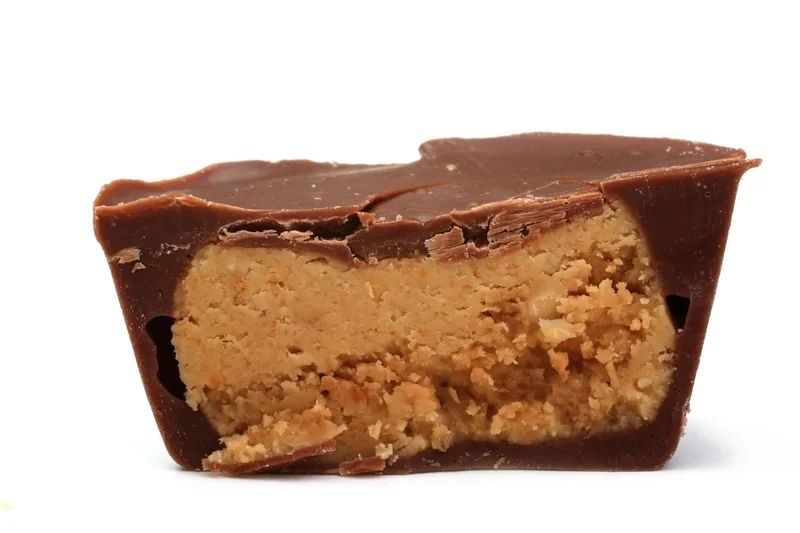
It’s hard to imagine improving the beloved combination of chocolate and peanut butter, but these handcrafted Halloween candies do. Our take on the Reese’s Peanut Butter Cup™ gets crunch from ground graham crackers, while the sweetness is tamed by using high-quality milk chocolate and natural peanut butter.
See our other Halloween candy bars: Almond Jay, Twixt, and Snickles.
Download the Peanut Butta Cup wrapper
Special equipment: We’re assuming you already have basic tools lying around (like a rubber spatula, bowls, and measuring cups), so here’s the special equipment you’ll need:
- Electronic kitchen scale for weighing out precise ingredient amounts.
- Chocolate thermometer to help properly temper the chocolate shell.
- Silicone pastry brush for spreading the chocolate inside your molds.
- 24-well mini muffin pan for forming your cups.
- Offset spatula for smoothing the tops.
What to buy: Professional pastry chefs use a type of chocolate known as couverture, which sets up nicely because it contains more cocoa butter than regular chocolate. The only trick is, you need to temper it. For this recipe, we used E. Guittard 38 percent Cacao Milk Chocolate Wafers; they can be found at specialty grocery stores and online.
Game plan: From experience we can say it’s best to avoid tempering chocolate on a hot day. If you can’t, be sure to work in an air-conditioned space. Chocolate behaves best in a room-temperature environment (mid-60s to low 70s).
Once your chocolate is in temper, it stays there for only a short time, so have everything ready to go and work quickly.
- Yield: 24 Peanut Butta Cups
- Difficulty: Hard
- Total: 1 hr 45 mins
- Active: 1 hr
Ingredients (4)
For the filling:
- 1/3 cup graham cracker crumbs
- 3/4 cup powdered sugar
- 3/4 cup natural crunchy peanut butter (no added sugar)
For the chocolate coating:
- 1 pound milk chocolate couverture or coarsely chopped milk chocolate
Instructions
For the filling:
- In the bowl of a stand mixer fitted with the paddle attachment, combine graham cracker crumbs, powdered sugar, and peanut butter. Mix on medium speed until filling is well combined, breaks into large chunks, and resembles cookie dough, about 3 minutes.
- Divide filling into 24 (2-teaspoon) balls, then form into round, compact shapes that will fit in the mini muffin pan wells. (Keep in mind that when the filling is in the wells, there should be enough room to cover it with chocolate.) Set aside.
For the chocolate coating:
- To temper chocolate, fill a large bowl with 2 inches of cold water, add 3 to 4 ice cubes, and set aside.
- Bring a saucepan filled with 1 to 2 inches of water to a simmer over high heat; once simmering, turn off heat. Place 12 ounces of the chocolate in a dry heatproof bowl. Set the bowl over the saucepan and stir until chocolate is completely melted and reaches 118°F. (Make sure the chocolate does not come in contact with water or exceed 120°F. If either happens, start over, as the chocolate is no longer usable.)
- Remove the bowl from the saucepan. Add remaining 4 ounces chocolate and stir until all chocolate is melted and cools to 80°F. To speed the cooling process, after all chocolate has melted place the bowl over the reserved cold-water bath.
- Return the bowl to the saucepan and stir until chocolate reaches 86°F; immediately remove from heat. Do not remove the thermometer from the bowl; check the temperature periodically to make sure it stays between 85°F and 87°F. (The chocolate must remain in this temperature range or it will not set up properly.) Keep the saucepan over low heat and use it to reheat the chocolate as necessary.
- To test if the chocolate is properly tempered, spread a thin layer on parchment paper and place it in the refrigerator for 3 minutes to set. If the chocolate hardens smooth and without streaks, it is properly tempered. (If it is not properly tempered, you need to repeat the process.)
- Using a small pastry brush (or a small, clean paintbrush), liberally spread tempered chocolate inside each cup of the muffin pan. Try to make your coating as even as possible, aiming for about 1/16 inch thick.
- Divide filling among chocolate wells. (Don’t push too hard or you’ll crack the coating.) Spoon chocolate over each filling until completely covered. Scrape across the top of the muffin pan with a palette knife or a flat spatula to remove excess chocolate and even out candy tops.
- Place the pan in the freezer for 20 minutes to set up. To remove candies, place a towel or a silicone baking mat on a counter and hit one edge of the muffin pan against the counter. If the candies don’t come out easily, freeze them for another 5 minutes and try again. The Peanut Butta Cups will last up to 3 weeks in the refrigerator or up to 2 months in the freezer. Let come to room temperature before serving.