If you like projects with high payoff and low effort, you’re in for a treat. This at-home garden requires zero soil, almost no maintenance, and won’t cost you a dime.
That’s because many of the vegetables you eat will regrow if you put their ends in water. Yep, you read that correctly. The bits you normally toss in the trash can be easily transformed into more food.
Here, farmer and plant specialists provide a simple guide to getting started. Just wait until you post these bad boys to Instagram:
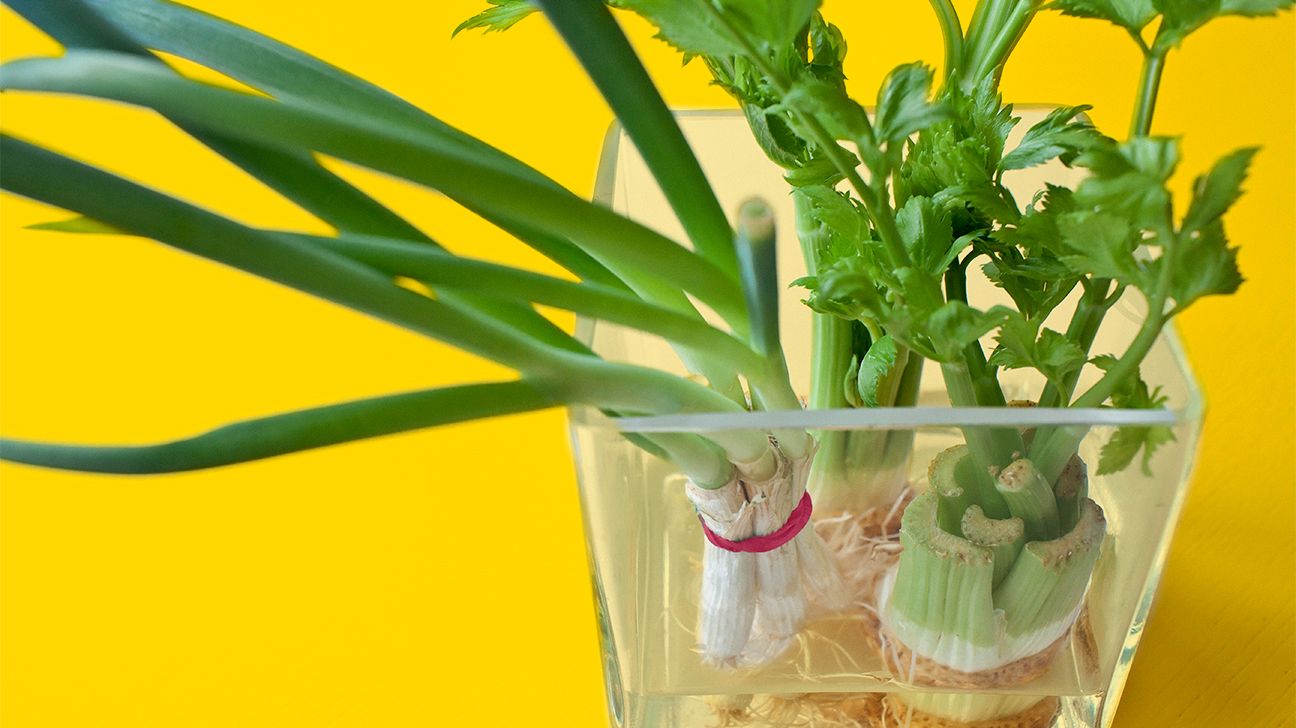
Celery may not be the most celebrated veggie out there but we give it props for versatility. From ants on a log, to the crunch in a salad, and the added flavor in a soup stock, the world needs celery more than it knows.
Follow these easy steps from celebrity gardener and founder of Farm-Based Foodie, L.Be Sholar, and expect to see sprouts with a few days.
How to do it
- Cut the celery stalks off at the root end, leaving around 2 inches.
- Place the root end into a shallow dish of water, ensuring it only covers the root area and not the stalks.
- Place the dish in the sunniest window you have. Sholar says it’s best to change the water often to keep your celery growths vibrant (i.e., at least once per week).
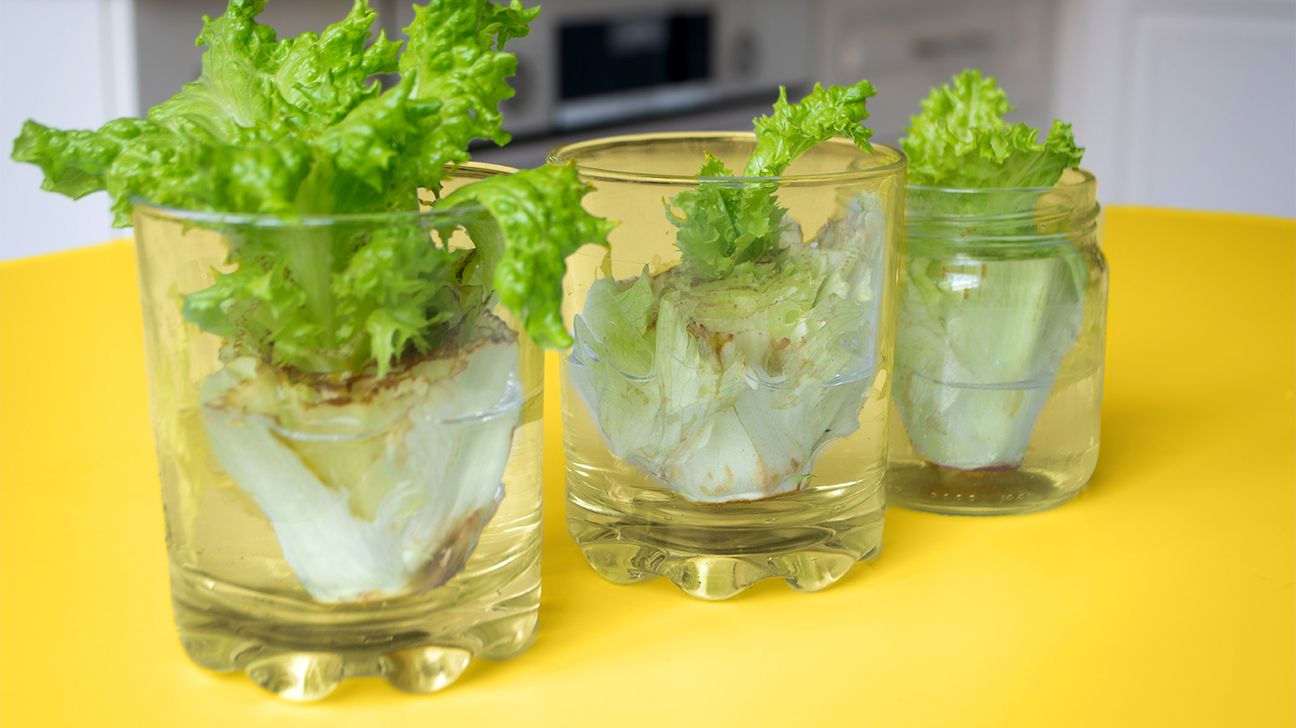
You really can’t go wrong having some extra lettuce around and while this won’t give you a full new head of lettuce, you can get enough for a salad or two, according to plant coach and apartment farmer, Nick Cutsumpas.
Within 3 to 5 days, you may see a little action — lettuce leaves sprouting up and out of the center of the core. For best results try using either romaine or butter crunch.
How to do it
- Use a sharp knife to cut off the core of the lettuce, leaving 2 to 3 inches intact.
- Place the core in a glass jar or transparent container with enough water to cover the bottom half of the core.
- Place the jar in a bright sunny spot. Cutsumpas says a south-facing window is best, but eastern and western exposure works, too.
- Change out the water every few days. “The lettuce will be thirsty, but make sure not to cover the core completely or it will start to rot,” he says.
You may have noticed buying fresh herbs at the store is pretty pricey. Even more reason to grow your own. While you can grow many herbs this way, Cutsumpas suggests basil, mint, cilantro, and oregano because their softer stems make sprouting easier.
Herbs take longer — expect a week or longer — than other plants so be patient.
Pro tip: They’ll produce more leaves if you transplant to soil. “Developing a sufficient root system before transplanting is highly dependent on the propagation conditions, but it normally takes 2 to 4 weeks depending on the herb in question,” he adds.
How to do it
- Cut a few stems to 5 to 6 inches in length. Remove the bottom leaves. Cutsumpas says to go after the ones that have green, tender shoots.
- Place in water in a jar.
- Sit the jar a south-facing window for best success.
Scallions (aka green onions) and leeks are cooking staples. You can chop them up raw in salads, sautee them in stir-fries, or caramelize them as a base for sauces and soups.
They also grow easily in water.
Cutsumpas says you’ll start to see impressive sprouts within a few days. He recommends transferring your plant to the soil so it will last even longer once you’ve found success in the water.
How to do it
- Just like lettuce, Cutsumpas says you’ll want to make a clear cut above the tender, white section, 2 to 3 inches near the roots.
- Use a tall jar and fill until the water covers half of the roots. Don’t be afraid to squeeze them in. These types of plants can thrive when bunched together.
- Place in a sunny south-facing window. Watch ’em grow and enjoy!
A delicious addition to salads and spice-filled soups, bok choy is a popular type of Chinese cabbage. It can be pricey to buy each week on your grocery store run, so why not try your luck at sprouting at home? These easy steps from Lovefoodies will get you started.
How to do it
- Cut the bok choy leaves at their base. Make sure to leave around 2 to 3 inches.
- Fill a container with 1 inch of water and stand the bok choy up in the middle.
- Change the water every couple of days — and watch your bok choy babies arrive.
Most people are either Team Fennel or Team Anti Fennel, thanks to its distinct taste. Part-licorice and part-fresh from the earth, it derives from the Mediterranean but now planted worldwide along coasts.
Here, Gardening Know How explains the steps.
How to do it
- Rather than throwing away or composting the bulb when you make dinner, keep it! You’ll leave a short piece of base and bulb to “pot.”
- Place this section in a shallow dish, with the base facing down.
- Let it rest in a sunny windowsill and change it’s water every few days. That’s it!
Cabbage is really one of the unsung heros of the vegetable world. Hearty and grown year-round, it’s an easy staple that won’t go bad the day you buy it (looking at you spinach). From coleslaw to sauerkraut, we have a lot to thank cabbage for.
Follow these steps by Gardening Know How and in a handful of days, you’ll start to see roots and new leaves appearing.
How to do it
- Cut out the core (the hard, white middle of the head).
- Place in a shallow bowl with a small amount of water. Make sure the bowl is in a well-lit, sunny area of your kitchen or home.
- Now, you can repot it or leave it there. Just make sure to replace the water a few times a week.
Lindsay Tigar is a lifestyle and travel journalist whose work has appeared in Travel + Leisure, National Geographic, CNN, Real Simple, and countless others. You can find a full collection at lindsaytigar.com.