Cue everybody’s fave bat mitzvah track (Lil Jon’s “Get Low,” duh), cause it’s time to get to the wall, to the wall.
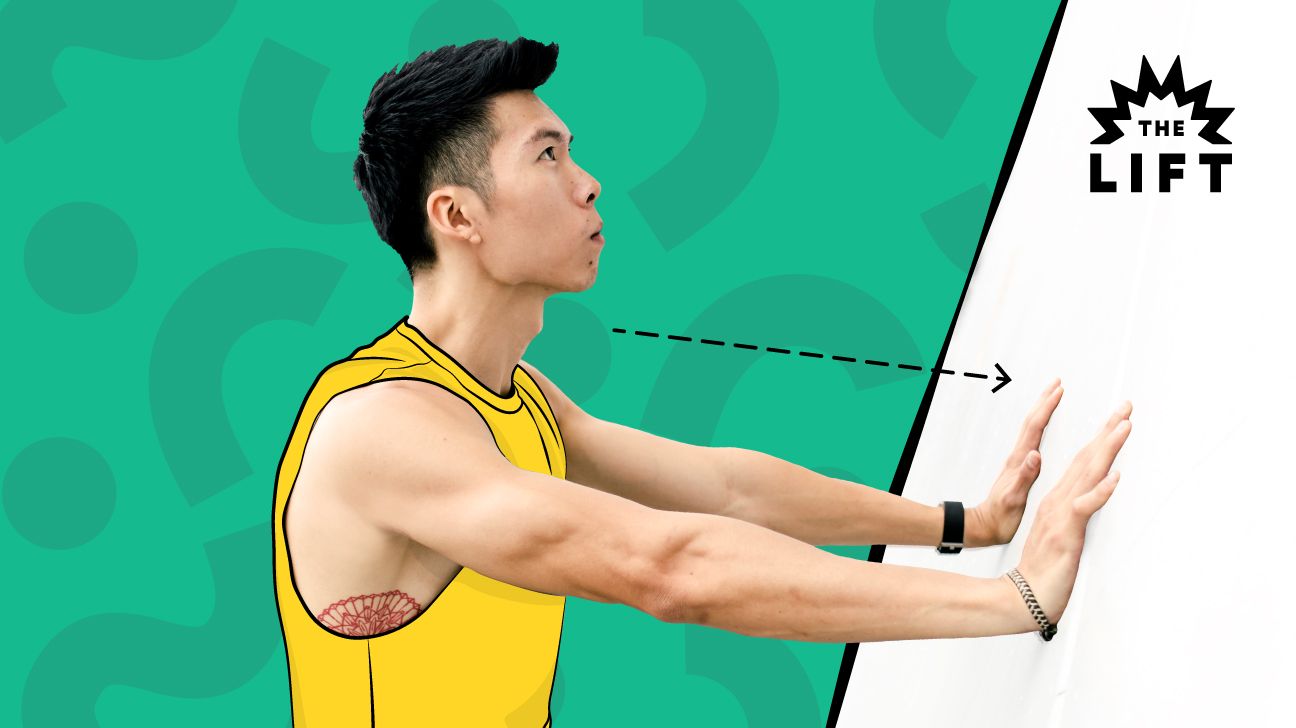
Introducing: the wall push-up.
A stepping stone to the harder standard push-up, the wall push-up can Hulk up your upper bod, develop functional core strength, tighten your tuchus, and (when done consistently) help you drop and give ’em 20.
How to do a wall push-up step by step:
- Stand with feet under hips, arm’s length away from a wall.
- Plant both palms on the wall, with wrists in line with your shoulders and fingers pointed at the ceiling.
- Screw pinkies into the wall to activate lats and brace core (by preparing for a gut punch). Then, pull up on quad muscles and clench butt cheeks like you’re holding in a fart.
- Maintaining this tight AF position, inhale and bend elbows straight back until your forehead or nose nearly boinks the wall.
- Exhale as you press the wall away and return to the starting position. That’s 1 rep.
Intending to move well won’t save you from injury if your form is subpar. That’s where these tips come in.
1. Brace your core the entire time
If you feel your hips or bits rubbing the wall, you’re doing it wrong. We’re supposed to be hardening our muscles here, not humping the wall!
“Sagging, sloppy-looking hips indicate that the core isn’t braced properly,” says Grayson Wickham, physical therapist and founder of Movement Vault, a digital movement education platform.
Brace better by tightening your midline. Not sure how? Consider these core-bracing cues:
- Tighten your stomach as if you’re about to be punched in the belly.
- Think about drawing your belly button in toward your spine.
- Expand your midsection out to the side.
- Pretend you’re about to shimmy into a pair of really (really) tight jeans.
2. Squeeze your shoulder blades together
Letting your upper back get loosey-goosey is a recipe for shoulder disaster.
Instead, “practice slightly pinching the shoulder blades back and down as if you’re holding a can between your shoulder blades,” says CJ Hammond, XPS certified personal trainer with RSP Nutrition.
3. Lower all the way down
“To actually reap the benefits of the wall push-up, you need to move through the full range of motion,” says Wickham. “Only doing partial reps will expose you to injury further down the line.”
Continue lowering until your forehead or nose nearly touches the wall. If you don’t have the strength to descend with control, take a step toward the wall to give yourself less distance to travel.
On the way back to the starting position, push the wall away until your arms are completely straight.
4. Maintain a neutral neck
Sorry, fam, but while you’re powering through these, you shouldn’t be checking out the #LifterBabe next to you or admiring your new shoes.
Once you’re in the high plank position against the wall, you want to look straight ahead to keep your neck in a neutral position.
The risks of *not* doing this, according to Wickham, are disc herniation, neck injury, and nerve impingement. Pass.
5. Breathe
Beyond just, ya know, keeping you alive, breathing can also help propel you through this movement.
“Inhale as you lower, then exhale as you push through the ground to return to start for an extra explosive oomph,” says Wickham.
Here’s proof they’re worth your time:
Easier than a classic push-up
It sounds obvious, but it’s safer to do a wall push-up well than to do a classic push-up with bad form.
“Wall push-ups reduce the gravitational pull present during a standard push-up,” explains Hammond. “They give you the chance to become strong enough in the push-up movement pattern to eventually do a standard push-up in good form.”
Works your entire body
No, that’s not an exaggeration.
If you’re doing them right (see above), wall push-ups activate and strengthen the same muscles as standard push-ups, says Wickham. That includes:
- chest
- triceps
- shoulders
- core
- glutes
- quads
- calves
Increases stability
Remember when we talked about wall push-ups strengthening your core? Welp, a strong core = a stable body.
Wickham explains, “The core muscles work together to help you stand and stay stable in life and sport.”
In other words, clumsy folks especially shouldn’t snooze on this move.
No equipment required
Face it: During these pandemic times, this is quite the selling point.
Wondering why you would do a wall push-up instead of a kneeling push-up? According to Wickham, if you can do a knee push-up, you should — they’re actually the better scaling option for folks working toward standard push-ups.
One thing, though: “Many people don’t have the strength to do a knee push-up if they’re just starting out,” says Wickham. “The wall push-up is an easier knee push-up.”
One really important way the wall push-up overtakes the knee push-up? You don’t have to worry about dirtying up your workout leggings.
Can you crank out 20 to 25 wall push-ups with good form (key term here: good form)? Take a step away from the wall. Tilt onto your tiptoes and place your hands lower down the wall.
“This will increase the demand on your shoulders and the pectoral muscles, making the movement harder,” says Hammond.
Once you can bang out 25 reps from this slightly more difficult position, take another step away from the wall. Continue this game until your body makes a 45-degree angle with the floor. At this point, Wickham says, you’re ready to give knee push-ups a whirl.
“Once you can do 20 knee push-ups with good form and without pain, you’re ready to try the classic push-up,” he says.
Or, as Lil Jon so eloquently puts it, get low get low get low, get low…