Back pain not only hurts, but it’s very annoying when it won’t go away (let me live my life!). If your bad posture or sedentary desk job has your back buggin’, yoga might just be your saving grace for back pain relief.
Yoga isn’t just about relaxing your mind, it’s also hella good for strengthening your body. Focusing on poses that stretch the back can work on different muscles to improve any imbalances and alignment issues that could be at the root of your pain.
Get ready to stretch it and say buh-bye to back pain with these yoga poses.
1. Downward Dog
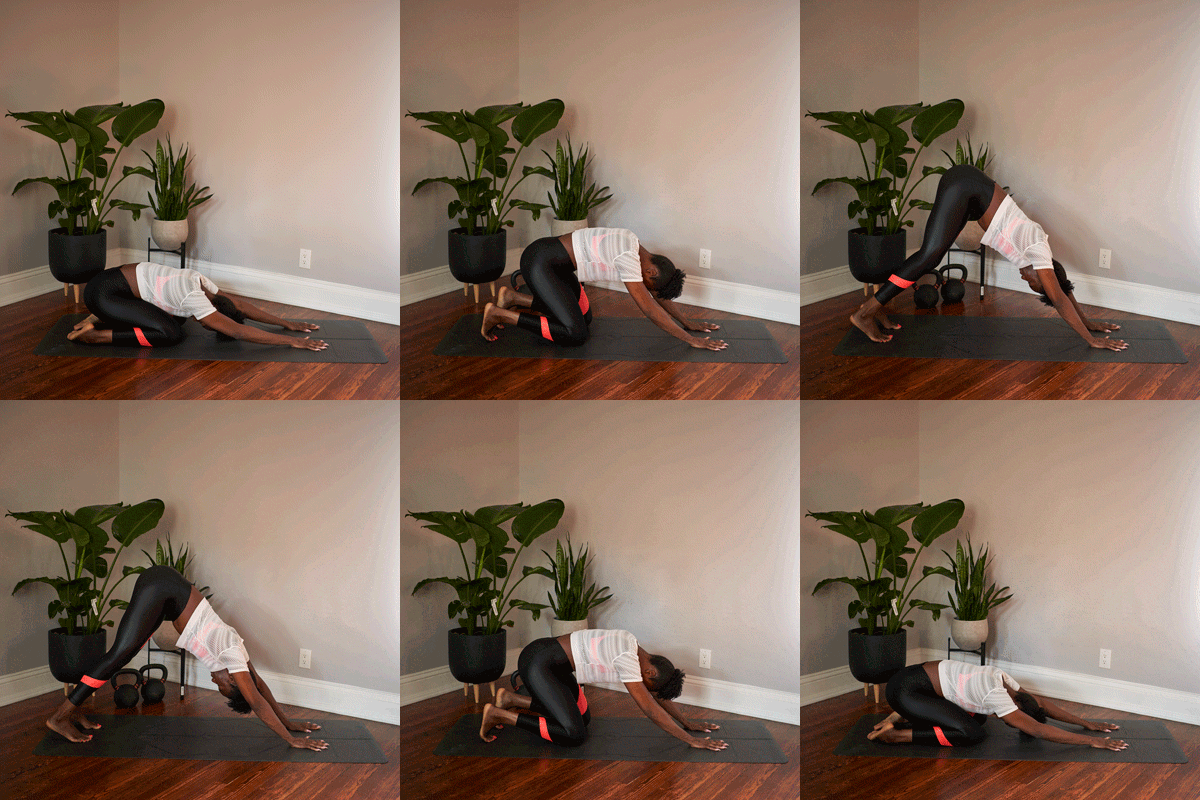
Downward Dog strengthens the back and shoulders, but it can also decrease pain in the back and sciatica.
- Get on all fours on the floor or mat.
- Place knees under your hips, place hands aligned with your wrists underneath your shoulders.
- Spread your palms, pressing into your hands. Then tuck your toes and lift up your knees.
- Move your sitting bones toward the ceiling.
- Lengthen your tailbone away from the back of your pelvis, putting a slight bend in your knees.
- With an exhale, press firmly into your hands.
- Be sure to pay attention to shoulder and hip positioning, making weight even on both sides.
- Keep your head in line with upper arms — don’t let it hang — and keep your chin tucked in.
- Hold this position for 1 to 3 minutes.
2. Extended Triangle Pose
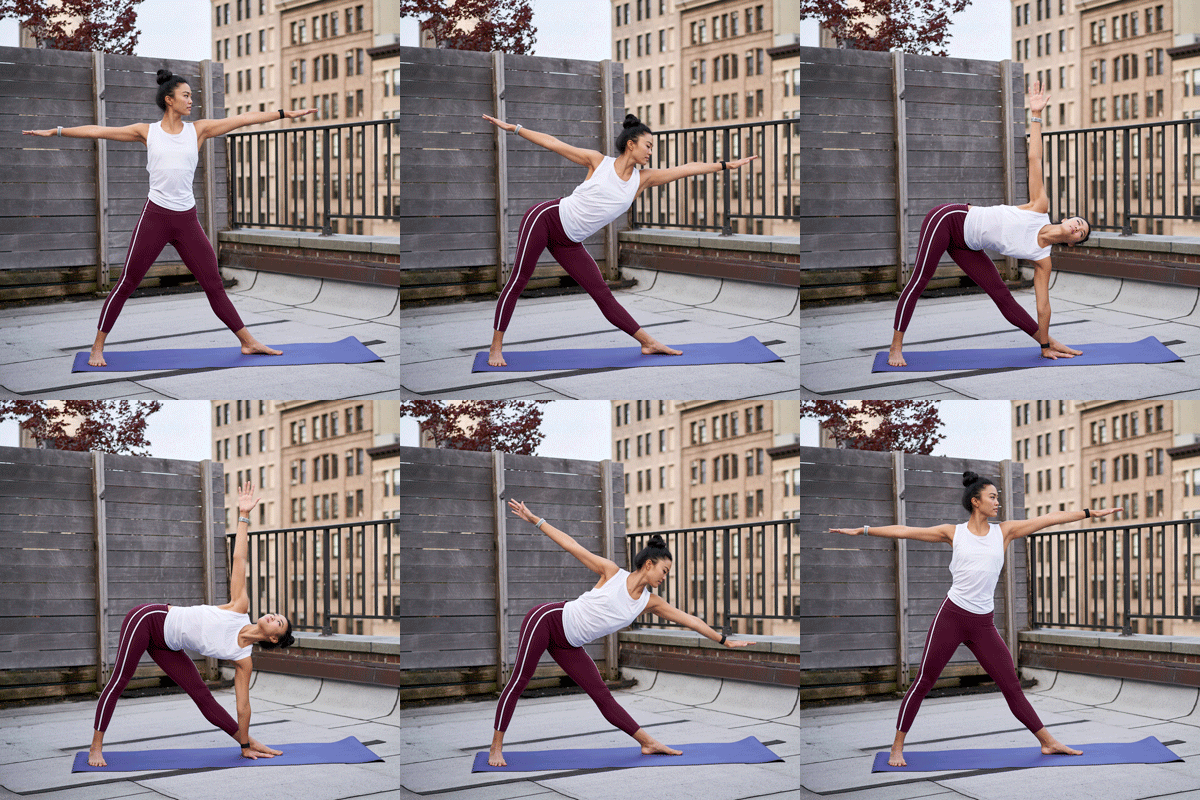
This super feel-good pose stretches all of the good spots, including the spine, hips, and groin. Plus, it also strengthens your shoulders, chest, and legs. This pose is known for alleviating pain from the back and neck.
- Stand with your feet about 4 to 5 feet apart.
- Turn your right foot forward with left toes at about a 45-degree angle.
- Lift your arms, with palms facing down, parallel to the floor.
- Hinging at your right hip, reach forward with your arms and torso.
- Bring your hand down onto the floor or a block, extending your left arm toward the ceiling.
- Stack your shoulders and hips so that your spine is in alignment.
- Keep your gaze up toward your left hand, forward, or down.
- Hold this pose for 1 minute then repeat on opposite side.
3. Cat-Cow
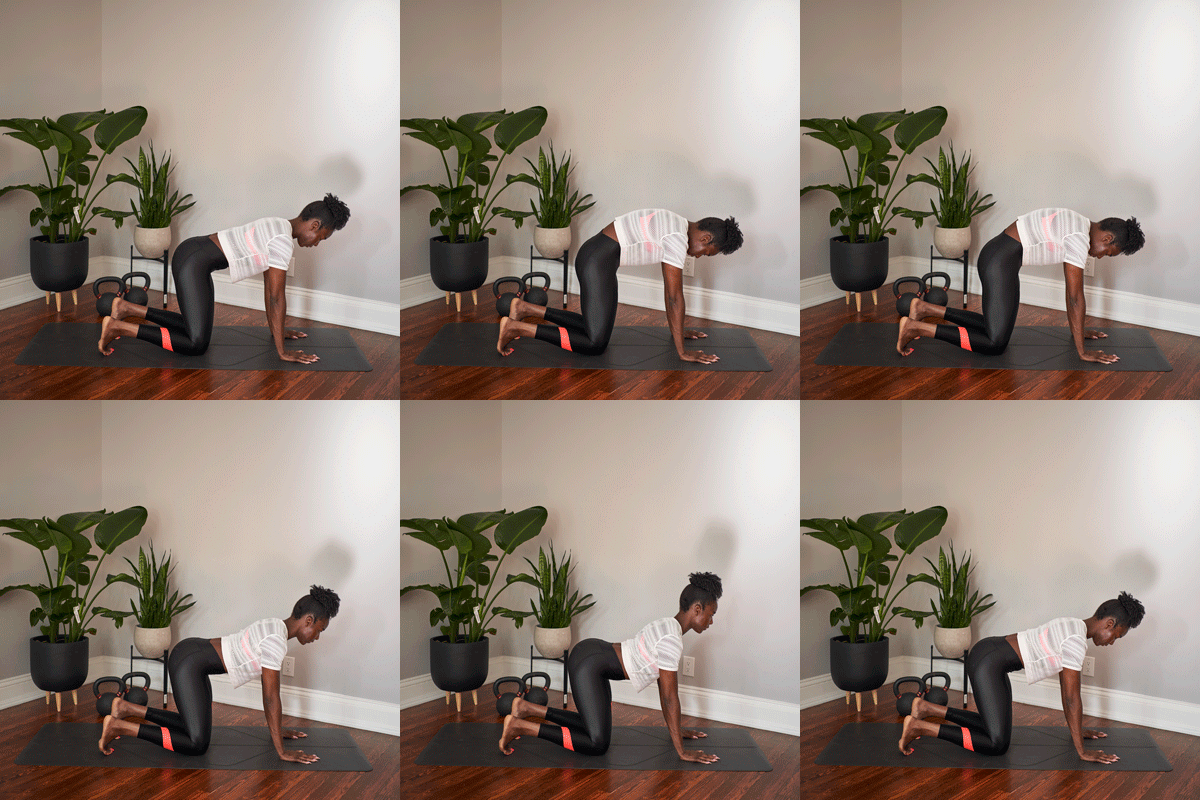
This pose is a gentle stretch of the spine to begin any workout or yoga session. It also helps stretch out the neck, shoulders, and torso, and increases flexibility over time.
- Start in a tabletop position on all fours with your knees below your hips and wrists below your shoulders.
- Inhale, letting the stomach drop, lifting the sitting bones upward while drawing the head and shoulders back, and chest forward.
- Exhale, arching your back like a cat, bringing the belly button toward the spine and pelvis in toward the rib cage, tilting your head toward the floor.
- Shift between these two positions 5 to 10 times.
4. Standing Forward Bend
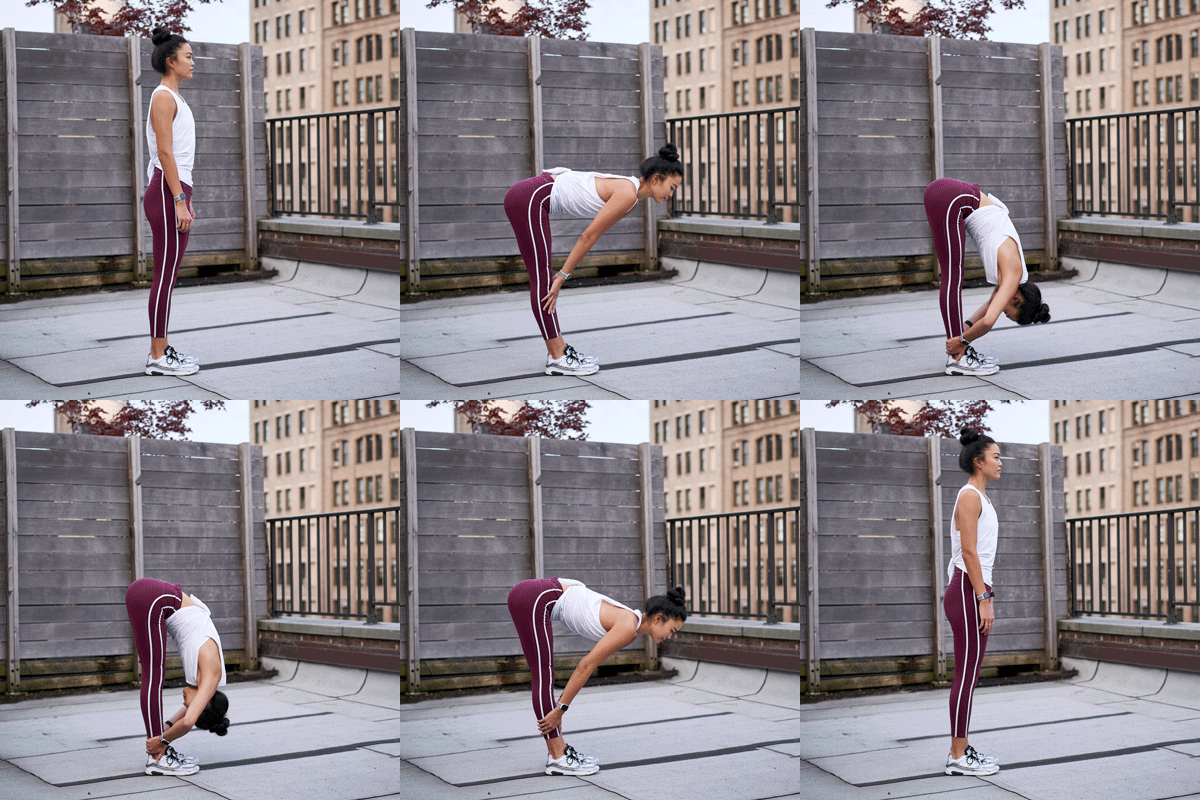
As Lil John once said, “bend over to the front and touch your toes.” Was he actually talking about this yoga pose?
- Stand with your feet together. With a slight bend in your knees, fold your torso over your legs. This movement should come from the hips, not your lower back.
- Place your hands on the ground in front of you or next to your feet.
- Inhale as you open your chest and lengthen the spine.
- As you exhale, extend the torso down without rounding your back.
- Repeat as many times as you feel stretched enough.
5. Pigeon Pose
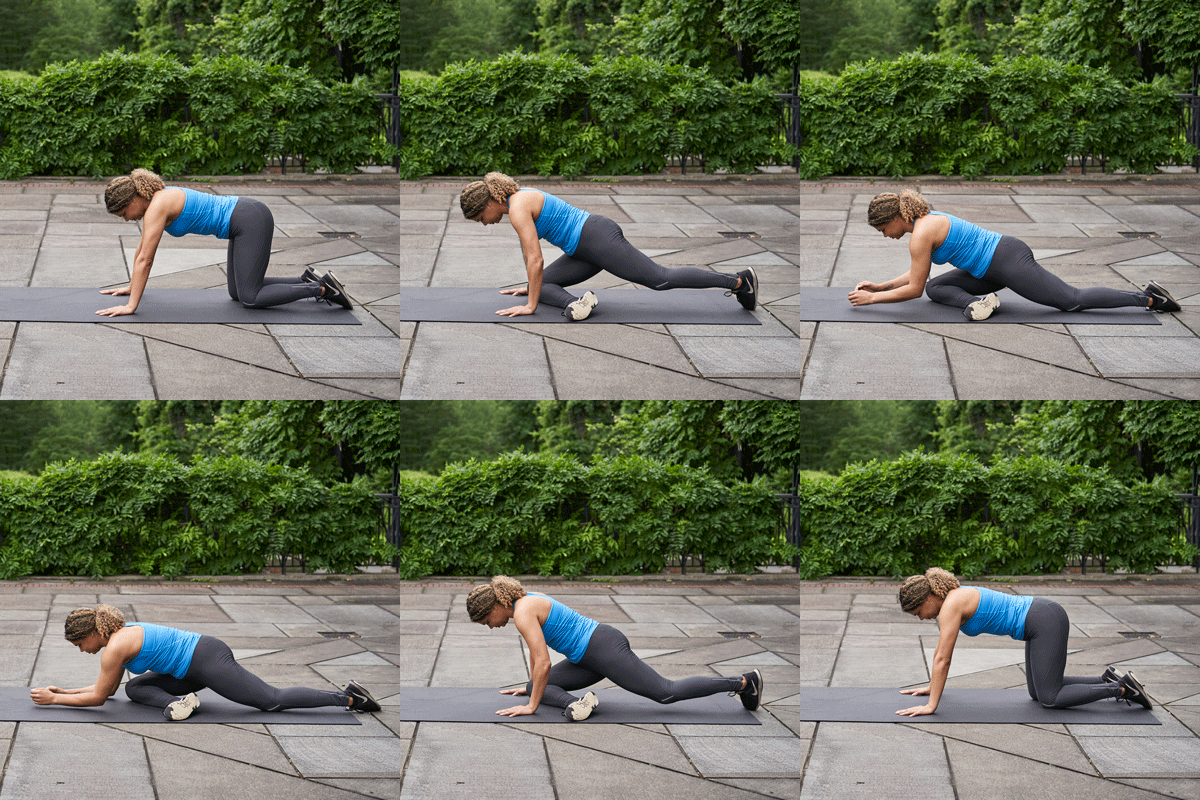
This is one of the best stretches for opening up the hips. If you sit at your job all day long, this is the daily yoga pose for you.
- Start in a tabletop position or in Downward-Facing Dog.
- Place your right knee at an angle toward the front of your mat.
- Place the left leg back as far as you can. Your right ankle will be positioned into your left groin.
- Open those hips the best you can, keeping the hips square.
- You can choose to keep your body in an upright position, using your hands for support, or you can fold your upper body down, placing your head on your hands.
- Breathe deeply. Stay in this position for up to 5 minutes.
1. Bridge Pose
Booty work at your service! Not only does a bridge pose strengthen the muscles along the spine, it works the glutes and the abs as well. This stretch helps correct your posture while standing or sitting.
- Lie on your back with your knees bent. Your feet should be flat on the ground, in line with your knees, with your arms at your sides.
- Raise your pelvis to the ceiling, squeezing your buttocks. The torso is upward with your back off of the ground. Your shoulders will do the work here with supporting your body.
- Hold the bridge for 5 seconds, focusing on squeezing that booty.
- Gently lower the torso down, one vertebra at a time.
- Repeat this 10 to 15 times per set with at least 3 sets.
2. Half Lord of the Fishes
Come on baby, let’s do the twist! This twisting position radiates energy into your spine and back. It’s also a good stretch for your hips, neck, and shoulders. If you’re feeling fatigue, this pose will help alleviate that pain.
- Get yourself into a seated position on the floor, bringing your right foot in toward your body.
- Bring your left foot around to the outside of your right leg.
- Stretch your spine as you twist your body to the left.
- For needed support, place your left hand on the floor behind you.
- Bring your right arm across your left thigh as you twist.
- Keep hips square.
- Hold for 1 minute then repeat sides.
3. Child’s Pose
This pose works quite a lot of muscles for you. It alleviates stress from your work, stretching out the lower back, neck, thighs, wrists, and ankles.
You’ll feel your spine lengthen and tension release from your body. This is a go-to stretch after any intense lower body or ab workout.
- Sit in a kneeling position with your buttocks resting on your feet.
- Spread knees apart and bend your body forward placing your hands stretched in front of you.
- Rest your forehead on the floor in front of you.
- Keep arms extended out.
- Breathe in and out, focusing on releasing any tension in your back.
- Keep this pose for up to 5 minutes.
4. Happy Baby
This pose will have you feeling just as the name says. The happy baby relaxes the back muscles and stretches out the hips, neck, and shoulders.
- Lie on your back and bend knees into your stomach.
- With an inhale, grab the outside of your feet with your hands. Open your knees up toward your armpits.
- Be sure your ankles are over your knees with heels flexed. Push feet into hands as you pull your hands down to create pressure and resistance.
- Hold for anywhere from 30 to 60 seconds.
5. Cobra Pose
This snake-like backbend strengthens your spine and can help soothe any sciatic nerve pain. It also opens and stretches your abs, shoulders, and chest. It’s a great recommendation for stress relief.
- Lie on your stomach with your hands underneath your shoulders.
- Bring your arms into your chest without letting your elbows bend outward.
- Press into your hands, lifting your upper body, opening chest and shoulders.
- Keep your pelvis grounded to protect and strengthen the lower back.
- Lift as far as you can — halfway, partway, or the whole way up.
- Keep a slight bend in your elbows.
- Exhale and release your body back to the mat, placing hands by your sides.
- Hold for 20 to 30 seconds then repeat 4 to 5 times.
1. Two-Knee Spinal Twist Pose
If you’re feeling any pain or tightness in your back or hips, this pose is a must for you. The twisting motion creates restoration and mobility in the spine and back.
- Lie on your back with your knees to your chest and your arms stretched out to your sides, like a letter T.
- Lower your legs to the left side, keeping them held close together, creating a twist motion.
- To enhance the stretch, turn your head to the right. You can also use your left hand to press down onto the knees.
- Keep both shoulders on the floor.
- Be sure to focus on your breathing during this pose.
- Hold for at least 30 seconds.
- Repeat on the opposite side.
2. Thread the Needle Pose
This pose is known to loosen the upper back muscles. It deeply stretches out the sides of the body; you’ll definitely feel it as you thread the needle.
- Start on your hands and knees in a tabletop position.
- Walk your hands out in front of you until they’re below your shoulders. Keep the arms straight and the rest of the body still as you do so.
- Take your left arm and pass it under your right arm while also rotating the chest to the right. The back of your left hand will rest on the floor with your palm up.
- Lower your left shoulder as much as you can while also placing the left side of your head onto the floor.
- Keep this pose for 20 to 30 seconds.
- Push up using your right arm to get back to the original position, then repeat on the opposite side.
3. Locust Pose
The locust pose is similar to the Superman Pose. It’s a calming backbend to get those kinks and pains out of your lower back, while also stretching the arms, legs, and torso.
- Lie on your stomach with your arms to your sides, palms facing up.
- Place your feet hip-width apart and parallel.
- Place your forehead onto the ground.
- Gently lift your head, chest and arms up as far as your body lets you.
- For an enhanced stretch, lift your legs as you lift your upper body.
- Keep your gaze straight or up as you stretch the back of your neck.
- Keep this post for up to 1 minute.
- Take a small rest before repeating.
4. Seated Forward Bend
This seated pose is a classic yoga pose that is great for your back and hamstrings. It’s known to relieve stress and create a calming sensation.
- Begin sitting with your legs in front of you.
- Reach arms to your sides and then over your head, reaching toward the ceiling.
- Inhale, stretching your spine.
- Exhale to lengthen your spine, moving forward into a bend. Keep your spine long as you hinge forward.
- Stay in this position or let the spine round forward.
- Keep your feet flexed during this pose. If you can reach, hold your ankles of shins for extension.
- Keep pose for 1 to 3 minutes.
5. Sphinx Pose
Another stress-reliever pose is the Sphinx Pose. This stretch strengthens your spine and booty. It also stretches out your abs, chest and shoulders — similar to Locust Pose.
- Lie on your stomach with your legs extended behind you.
- Engage those lower body muscles, anchoring the pelvis to the floor.
- Place elbows under your shoulders with your forearms and hands still on the floor.
- Rolling your shoulders back, gently lift up your head and upper body.
- Lift up through your spine.
- Remain engaged in the stretch and muscles being used, keeping your gaze straight ahead.
- Stay in this pose for up to 5 minutes.
Studies have shown that yoga can in fact be beneficial for back pain.
In a 2017 study, a small group of 320 adults were assessed to see if yoga was as effective as physical therapy for treating chronic lower back pain. Participants in both the yoga and physical therapy classes showed similar improvements in their pain levels.
Another study found practicing yoga decreased pain levels by a small to moderate amount over a short period of time. While this research is helpful to see the benefits of yoga, more research is needed to know exactly how beneficial practicing yoga is for back pain.
If you’re willing to try something new for back pain, yoga could be your answer. Talk with your doctor, and if they give you the green light, find a certified Yoga teacher in your area, or try these poses at home.
Do each pose to the best of your ability, and don’t forget to listen to your body (aka if it hurts, stop!). If the pain worsens or won’t go away, consult your doctor ASAP.
By adding a few minutes each day of yoga, you’ll be giving your body the love it deserves (and hopefully relief from that back pain). Go forth and be the best yogi you can be.

