
We include products we think are useful for our readers. If you buy through links on this page, we may earn a small commission. Here’s our process.
Greatist only shows you brands and products that we stand behind.
Our team thoroughly researches and evaluates the recommendations we make on our site. To establish that the product manufacturers addressed safety and efficacy standards, we:- Evaluate ingredients and composition: Do they have the potential to cause harm?
- Fact-check all health claims: Do they align with the current body of scientific evidence?
- Assess the brand: Does it operate with integrity and adhere to industry best practices?
FreshCoat is an ongoing series at Greatist that features easy, affordable DIY home projects, so you can add joy to your life by sprucing up your space.
You know what they say: tidy house, tidy mind! OK maybe no one actually says that but it’s definitely true for me. The more organized my house is, the more relaxed I feel. So when spring rolls around, I like to come up with new organizing methods to keep everything in its proper place.
Since it’s a challenge (read: expensive) to find storage solutions that look good and work well, I’ve developed a thing for boxes and baskets. Brilliant for keeping clutter out of sight but still easy to access when you need to grab something, I keep a basket in every room.
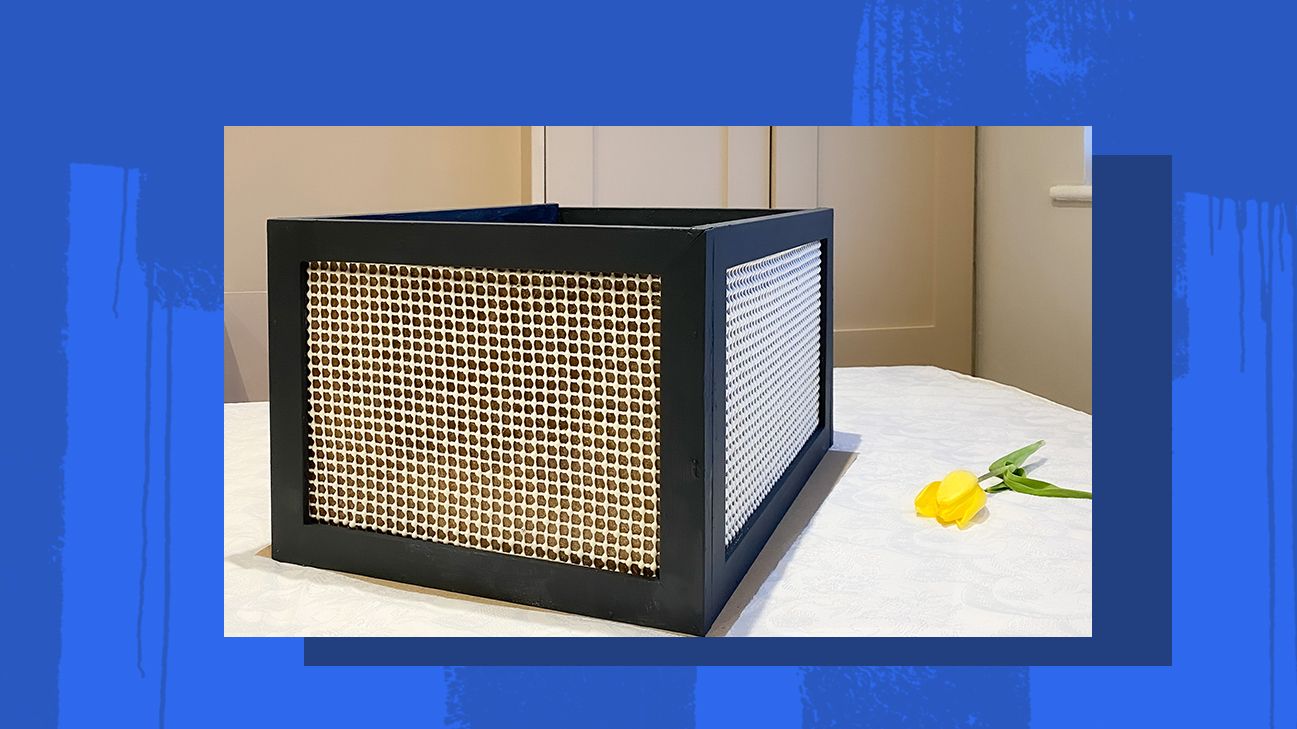
I love cane webbing and rattan-style furniture, but buying cane webbing by the sheet can be super pricey. Instead, I discovered using nonslip grip matting glued to picture frames creates a similar effect for a fraction of the price.
This DIY project is great because you can paint the boxes any color you want. And you might already have many of the supplies you need laying around your house. I use my completed box to keep my towels in the bathroom but I plan to make more of them to store toys in my little girl’s playroom.
This project should take about an hour to complete plus an hour for the glue to dry. Here’s how to do it.
I used four photo frames to create the walls for this box. I recommend using four frames that are the same dimensions so that your walls meet evenly.
One thing to consider about this project is that you’ll need to customize the size of the base board to match the size of your photo frames. If you don’t own a saw, you can get it cut to size at a home improvement store.
- 4 wood or faux wood photo frames
- 1 wooden Medium Density Fiberboard, cut to the dimensions of your photo frames
- nonslip grip mat
- spray adhesive
- hammer
- 1/4 inch nails
- masking tape
- wood glue
- sand paper
- black paint
Step 1. Create the walls of the box
- Carefully remove the glass and mounts and store these away for a future project.
- Put the wood frames aside for now and hold onto the frame backings.
- Cut out four pieces of matting, (one for each of the wood backings). The easiest way is to lay each backing on to the roll of matting and cut around the edges.
- Following the instructions on your spray can, glue each frame backing to its corresponding piece of matting.
- Spray glue onto both surfaces (the backing and the matting).
- Firmly press each backing down onto each piece the matting and let dry.
Step 2. Prepare your frames
- Lightly sand your frames.
- Then prime and paint each one (let the primer dry for 20 minutes or so before adding the paint coat). I painted my box navy blue to contrast with the cream matting but you can paint yours any color you like.
- After the paint is dry, reinsert each frame backing (that now have the matting attached) back into its respective frame and fold down the tabs. You now have the four walls to your box.
Step 3. Assemble your box
- To glue your frames to the base, start by laying the base board down on a flat surface.
- Apply a layer of wood glue to two conjoining edges of the base board so that you form a corner.
- Grab two of your frames and firmly press their bottom edges into the edges of the baseboard that have glue. Add a few pieces of masking tape to keep the sides together while the glue dries.
- Repeat this step with the last two sides making sure to apply wood glue to all areas of the frames and baseboard that meet.
- Use your hammer to add nails to each edge and base, the nails are there for reinforcement but the wood glue should hold your box together.
- Allow time for the wood glue to dry and then touch up your paint if needed.
I hope you enjoyed reading this tutorial and I would love to see your creations — please be sure to tag me on Instagram @atoakhill!