
We include products we think are useful for our readers. If you buy through links on this page, we may earn a small commission. Here’s our process.
Greatist only shows you brands and products that we stand behind.
Our team thoroughly researches and evaluates the recommendations we make on our site. To establish that the product manufacturers addressed safety and efficacy standards, we:- Evaluate ingredients and composition: Do they have the potential to cause harm?
- Fact-check all health claims: Do they align with the current body of scientific evidence?
- Assess the brand: Does it operate with integrity and adhere to industry best practices?
FreshCoat is an on-going series at Greatist that features easy, affordable DIY home projects, so you can add joy to your life by sprucing up your space.
When we moved into our new home in January 2020, it needed a complete renovation. I’ve always wanted one of those beautifully styled homes you see on social media, but before I could start buying paint and furniture, I had to get the necessary stuff done: electrics, heating, plasterboard, insulation, etc.
As I write this, the renovation still isn’t done. But in the meantime, I’ve satisfied my urge for beautifying and decorating by finding affordable and easy ways to make things myself. I love getting crafty, and whenever I see a beautiful piece of home décor, I start thinking about how I can recreate it.
I recently started seeing these beautiful seasonal wreaths online, but I couldn’t justify buying one with a price tag between $100 to $175 apiece. I knew I’d inevitably want one for each season, and I wasn’t about to spend $400 to $700 on wreaths a year!
So, I started making them myself. I’ve discovered that these simple half-hoop wreaths are the perfect detail to make my home feel unique and loved.
My favorite way to make the wreaths is with eucalyptus because it’s easy to work with, lasts for years, and has the most amazing fragrance as it dries. But you can use all sorts of plants and trees. So far, I’ve used pampas, hydrangea blooms, and holly gathered from our garden.
Call your local florist
I buy my eucalyptus from my local florist. He’s so helpful and always ready to give advice about what flowers or plants could work well for me. If you’re able, I highly recommend chatting with yours.
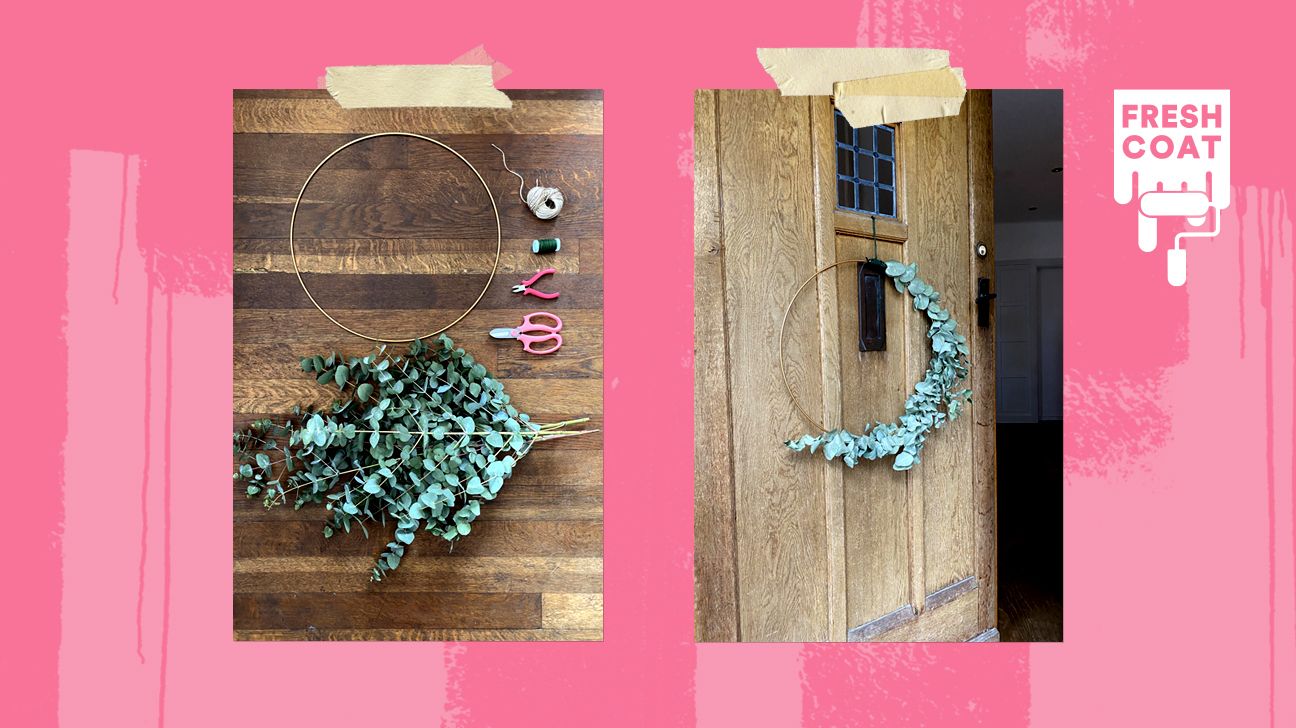
One of the best parts of this project is how few supplies you need to pull it off. I use a 20-inch metal hoop, but you can change up the size depending on what look you’re going for.
Click on the links below to be directed to Amazon.
- 4 to 5 stems of eucalyptus (or a plant of your choice), gathered or bought from your local florist
- 20-inch metal floral hoop
- florist wire
- wire cutter
- florist shears
- twine
Total cost to make two wreathes: ~$75
Total project time: 30 minutes to 1 hour
Now comes the fun part! Below are step-by-step instructions for putting together your wreathe.
- Gather your supplies.
- Lay your stems over the hoop to decide which placement will look the best. I like placing two stems with the tips of their leaves pointing up toward the top of the hoop and placing two stems opposite that with their tips facing the bottom of the hoop. Sometimes, I add a fifth stem in the middle to give the center a fuller look.
Note: Each stem will have a different number of leaves, so you’ll need to move them around, changing which stem goes where, until the placement looks even.
- Locate where the hoop joins ends and place that area so that the stems will cover it. I place mine in the middle on my left.
- Move your stems to the side temporarily without rearranging the placement.
- Wrap the florist wire around the top of the hoop three or four times. The wrapped area is where the tips of your first stems will be.
- Place the stems back over the hoop.
- Gather the two upward-facing stems and the hoop so that you can hold them in place with one hand.
- Wrap the wire around the stems and hoop until you reach the 180-degree mark on the hoop.
- Cut the wire using the wire cutters and wrap the remainder of the wire around the hoop so that it can’t be seen.
- Turn the hoop 180 degrees so that you can hold the stems and hoop in place exactly as you did with the first side.
- Repeat what you did with the first stems.
- Use the shears to cut away any stems that are sticking out.
- Add more leafy stems to get the look you want. The stems I used were bushy already, so I didn’t need to add more stems to my wreathe.
- Tie some twine or string to the top of the hoop, and you’re ready to hang your wreathe!
I hope I’ve inspired you to give wreathe-making a go for yourself. I would love to see your creations. Tag me @atoakhill on Instagram, so I can see them!