
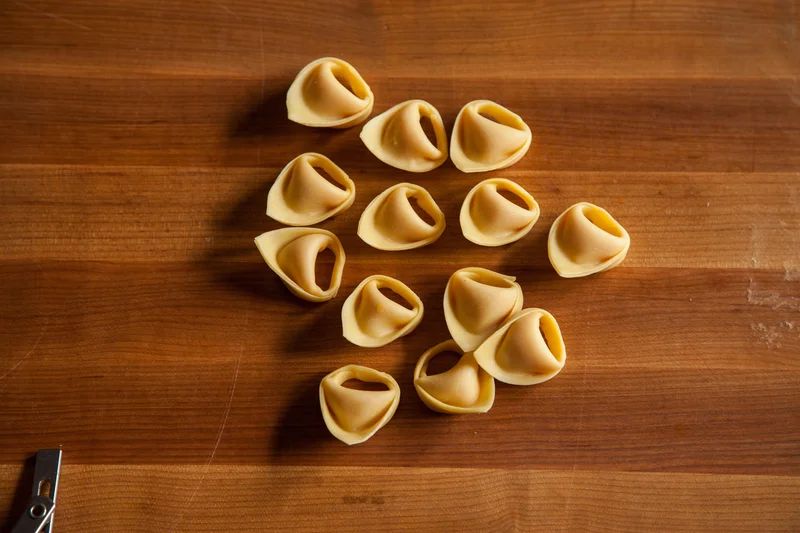
At Flour + Water restaurant in San Francisco, Chef Thomas McNaughton makes exquisite pasta dishes from carefully made doughs. Here’s his recipe for northern Italian–style ravioli dough (he calls it rav dough), made with Italian “00” flour and whole eggs in addition to egg yolks and extra-virgin olive oil. If you have a kitchen scale, all the better: Precise measuring will yield pasta that’s lithe, silken, and properly firm, perfect for ravioli, tortelloni (pictured above), and other filled shapes. As every nonna knows, practice makes perfect. This is a recipe you’ll probably have to make more than once to get exactly right. Use this dough for Pumpkin Tortelloni with Sage and Pumpkin Seeds, also from Flour + Water. And check out our behind-the-scenes visit to McNaughton’s test kitchen.
What to buy: Italian “00” flour is not a type of wheat but refers to the fineness of the grind in the milling process (“00” is super fine). It contains only the endosperm, and is almost always milled from soft wheat. The Antimo Caputo brand is available online.Adapted from “Flour + Water: Pasta” by Thomas McNaughton with Paolo Lucchesi
- Yield: 556 grams (20 ounces) of dough
- Difficulty: Hard
- Total: 45 mins, plus 30 mins to 6 hrs resting time
- Active: 45 mins 0 Ratings
Ingredients (5)
- 360 grams (2 packed cups, unsifted) “00” flour
- 5 grams (1 teaspoon) kosher salt
- 100 grams (1/2 cup, or about 2 large) eggs
- 90 grams (1/3 cup, or 5 to 6) egg yolks
- 6 grams (1 1/2 teaspoons) extra-virgin olive oil
Instructions
Step 1: Mixing
- Place the flour on a dry, clean work surface, forming a mound about 8 to 10 inches in diameter. Sprinkle the salt over the middle of the mound. Using the bottom of a measuring cup, create a well 4 to 5 inches wide, with at least half an inch of flour on the bottom of the well.
- Carefully add the eggs, egg yolks, and olive oil into the well. With a fork, gently beat the eggs without touching the flour walls or scraping through the bottom to the work surface. Still stirring, begin to slowly incorporate the flour “walls” into the egg mixture, gradually working your way toward the outer edges of the flour without disturbing the base, if you can help it. If the eggs break through the wall, quickly scoop them back in and re-form it. Once the dough starts to take on a thickened, pastelike quality called a slurry, slowly incorporate the flour on the bottom.
- When the slurry starts to move as a solid mass, remove as much as possible from the fork. Slide a bench scraper or spatula under the mass of dough and flip, turning it onto itself to clear any wet dough from the work surface. With your hands, start folding and forming the dough into a single mass. The goal is to incorporate all the flour into the mass. Using a spray bottle to liberally spritz the dough with water is essential. The dough will be very dry, and it’s essential that you generously and constantly spritz to help any loose flour stick to the dry dough ball.
- When the dough forms a stiff, solid mass, scrape away any dried clumps of flour from the work surface and discard them (if incorporated into the dough, they’ll show up as dry spots in the pasta).
Step 2: Kneading
- Kneading is essential: It realigns the protein structure of the dough so that it develops properly during the resting stage that follows. Pasta is easy to underknead but virtually impossible to overknead. It’s simple—drive the heel of your dominant hand into the dough. Push down and release, and then use your other hand to pick up and rotate the dough on itself 45 degrees.
- Drive the heel of your hand back in the dough, rotate, and repeat for 10 to 15 minutes. When the dough is ready, it will stop changing appearance and texture. The dough will be firm but bouncy to the touch and have a smooth, silky surface, almost like Play-Doh. Tightly wrap in plastic wrap.
Step 3: Resting
- At this stage, the flour particles continue to absorb moisture, which further develops the gluten structure that allows pasta dough to stand up to rolling and shaping. If you plan to use the dough immediately, let it rest at room temperature, wrapped in plastic, for at least 30 minutes prior to rolling it out (the next step). If resting for more than 6 hours, put the dough in the refrigerator. It’s best to use fresh dough within 24 hours. Under proper refrigeration, the dough will hold for 2 days, but avoid letting it rest that long, since the yolks will oxidize and discolor the dough.
Step 4: Rolling
- Rolling is the last phase of the mixing process. Rolling out by machine, hand-crank model or electric one, should be a delicate, almost Zen-like art. You can only roll out dough that has rested for at least 30 minutes at room temperature. If it has rested for longer in the fridge, give it enough time to come back to room temperature. The fat content of pasta dough is so high that it will solidify when cold, so it needs to come back to room temperature to be easier to roll.
- To start, slice off a section of the ball of dough, immediately rewrapping the unused portion in plastic. Place the piece of dough on the work surface and, with a rolling pin, flatten it enough that it will fit into the widest setting of the pasta machine. You do not want to stress the dough or the machine. Try not to add any raw flour in the rolling process. Extra flour added at this point sticks to the dough and, when cooked, that splotch turns into a gooey mass, a slick barrier to sauce. It dulls the seasoning and flavors of both the dough and the finished dish. Begin rolling the dough through the machine, starting with the widest setting. Guide it quickly through the slot once. Then decrease the thickness setting by one and repeat. Decrease the thickness setting by one more and roll the dough through quickly one more time. Once the dough has gone through three times, once on each of the first three settings, it should have doubled in length.
- Lay the dough on a flat surface. The dough’s hydration level at this point is so low that you’ll probably see some streaks. That’s normal, which is the reason for the next crucial step: laminating the dough.
- Using a rolling pin as a makeshift ruler, measure the width of your pasta machine’s slot, minus the thickness of two fingers. This measurement represents the ideal width of the pasta sheet, with about a finger’s length on each side so there’s plenty of room in the machine. Take that rolling pin measurement to the end of the pasta sheet and make a gentle indentation in the dough to show the measurement’s length. With that mark as the crease, fold the pasta over. Repeat for the rest of the pasta sheet, keeping that same initial measurement. For best results, you want at least four layers. Secure the layers of the pasta together with the rolling pin, rolling it flat enough that it can fit in the machine. Put the dough back in the machine, but with a 90-degree turn of the sheet, so that what was the bottom edge of the pasta is now going through the machine first.
- This time around, it’s important to roll out the dough two to three times on each setting at a steady, smooth pace (the dough contains a gluten network, so if you roll it too fast, it’ll snap back to its earlier thickness). The more slowly you crank the pasta dough, the more compression time the dough has; it’s important to stay consistent in the speed in order to keep a consistent thickness. You should be able to see and feel the resistance as the dough passes through the rollers. On the first time at each level, the dough will compress. It’s time to move onto the next level when the dough slips through without any trouble. The first few thickness settings (the biggest widths) usually require three passes. Once you’re into thinner territory, there’s less pasta dough compressing, so it goes more quickly and two passes should get the job done.
- When handling the sheet of dough (especially as it gets longer) always keep it taut and flat. Never grab, flop, or twist the sheet. The sheet should rest on the inside edges of your index fingers with your fingers erect and pointed out. The hands don’t grab or stretch the dough; instead, they act as paddles, guiding the sheet of dough through the machine. Use the right hand to feed the machine and use the left hand to crank. Once the pasta dough is halfway through, switch hands, pulling out with the left hand. If you have trouble doing it alone as the dough gets longer and thinner, find a friend to help juggle the dough, or roll out a smaller, easier-to-wield batch.
- Once you roll out the dough, immediately form it into the shapes your recipe calls for.