
So, you’ve delved into a bit of yoga. You like it, your chakras are *super* aligned, and you feel ready to step it up a notch. Enter Camel Pose.
What is the Camel Pose?
Heads up! Here’s everything you need to know about Camel Pose:
- The Camel Pose (Sanskrit: Ustrasana) is an intermediate-level yoga position.
- It focuses on your chest, abs, and quads while also being good for posture and back pain.
- Like all yoga exercises, it can also relieve stress and anxiety.
- Modifications of the pose can help you step the difficulty up or down.
- It’s best to consult a physical therapist before trying the move if you’re working through injury.
The Camel Pose can help you move from beginner to intermediate level while still providing plenty of support and confidence. Let’s learn more.
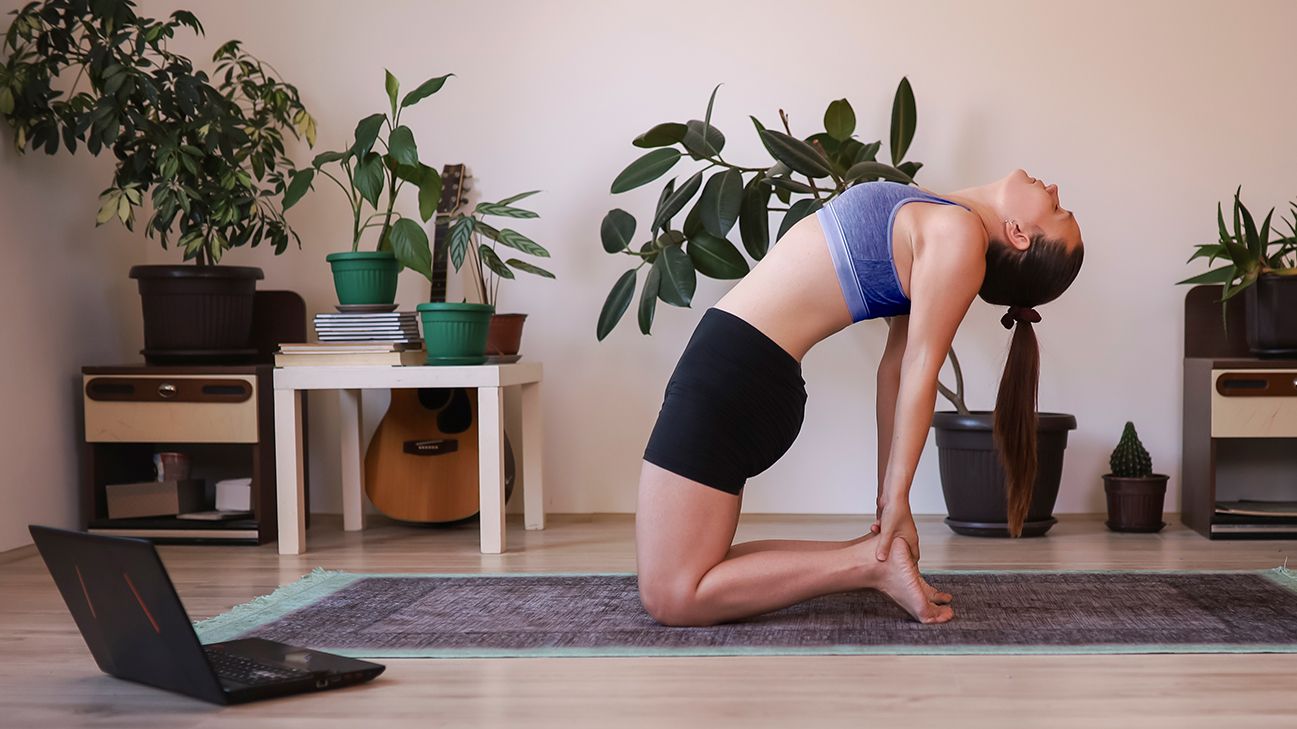
Entering Camel Pose
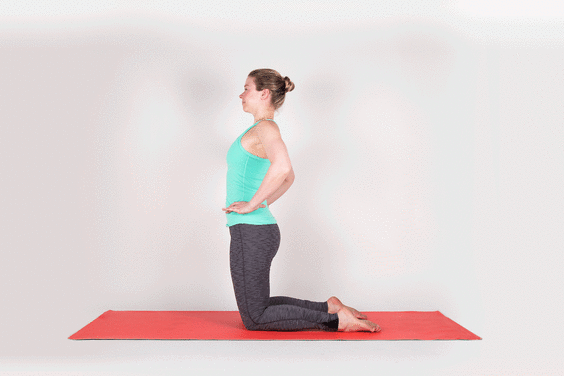
You don’t want to take any chances where your spine is concerned. Follow these steps and you’ll be nailing perfect form with your Camel Pose in no time:
- Begin on your knees, with your legs hip-width apart.
- Put your hands on your hips.
- Rest your thumbs against the base of your spine.
- Align your hips so they’re directly above your knees.
- Tense your inner thighs, squeezing them toward each other.
- Inhale. As you breathe in, raise your torso and pull your elbows together, you’ll feel your rib cage expanding.
- Move your hands so their heels rest on the heels of your feet.
- As your torso begins to raise and expand, allow your head to move back until you’re looking at the ceiling, and engage your shoulder muscles to cushion your neck.
- Hold for a breath.
While you’re working your way up to full Camel Pose, you can make the pose easier by placing blocks between your legs and behind your back. (A little more on this to follow in the “modifications” section.)
Exiting Camel Pose
To exit the Camel Pose:
- Lead with your chin until it’s tucked back into your chest.
- Draw your hands back to your hips.
- Engage your abs.
- Steadily return your back to the starting position.
Make sure you’ve got total control over your movements at all times — avoid jerking motions and definitely any overextension of your neck or back.
The Camel Pose stretches your chest, abdomen, and quadriceps. Folks often neglect these key areas thanks to the sedentary lifestyle that many lead in the 2020s. That can often lead to back pain and slouched posture, alongside a host of less immediately noticeable health concerns.
A research review indicated that too much time sitting down plays a role in reducing the metabolism and restricting blood flow through the body. Exercise helps address these deeper concerns. Flexing and extending your spine with Camel Pose is going to:
- help blood circulate through the discs in your back
- increase your spine’s natural stability and mobility
- improve posture and ease pain
Yoga’s positive effect on mental health is the subject of frequent studies. One study on the effects of yoga on teachers found that it reduced their anxiety and improved their mental well-being. And that’s teachers, some of the most stressed-out people you’ll ever meet.
Camel Pose isn’t exactly a yoga stretch for raw beginners, but it isn’t master-level either. That means that by the time you’ve perfected your Camel Pose, you’re likely to be a little further along your yoga journey — with all the peace of mind that can come with it.
That’s a key benefit of yoga. It can help you promote positive health behaviors — habits that combine to make a worthwhile impact on your overall physical and mental well-being.
Like any yoga position, the Camel Pose is all about motion, breathing, and flexibility. That makes it adaptable if you’re not quite at a yogi level or want to try an advanced version.
Here are some ideas for repurposing Camel Pose in line with your own fitness goals.
A simpler modification: Resting your hands on blocks
Camel Pose is bendy as all heck. While working up to the full pose, using blocks can take the hump out of the process.
If you choose the block route, place them behind your back between your legs. That way, you can more easily plant your hands on a supportive surface if your heels are a little out of reach.
You can position the blocks at any height that is comfortable and allows you to feel the benefits of the stretch.
Modified Camel Pose: Half-Camel
Try this slightly easier variation, and see if you can level up to full Camel Pose later on:
- Begin on your knees, with your legs hip-width apart and your hands on your hips, resting your thumbs on the base of your spine.
- Raise up until your hips align above your knees.
- Inhale as you pull your elbows together and engage your core.
- Move one hand back to rest on its corresponding foot (right hand to right foot or left hand to left foot).
- As you inhale again, extend your other hand toward the back wall and let your head follow
- Allow your head to fall all the way back, hold for 3 to 6 breaths.
- Return both hands to the base of your spine, letting your head and torso follow them forward.
- Hold for a moment.
- Repeat with the other hand.
Cat and Camel Pose
Let’s ease things up a bit. This one isn’t a pose so much as a flow between two poses. If you’ve yet to perfect your Camel Pose (and it’s definitely not easy), try laying the groundwork with the Cat and Camel yoga pose:
- Start on your hands and knees, with your palms against the floor. Your wrists should align beneath your shoulders and your knees beneath your hips.
- Inhale, tilt your pelvis to raise your tailbone. You’ll feel your stomach naturally lower itself.
- Let your spine ripple from your tailbone to your neck.
- Lift your head upward, staying careful not to strain your neck too far.
- Hold for a moment.
- Exhale, tilting your tailbone the other way so that your spine begins to ripple in the opposite direction.
- Raise your abs up toward your spine and press your shoulder blades up toward the ceiling.
- Lower your head until your chin is tucked into your chest.
- Move between these two positions slowly.
Camel Pose to Wheel Pose
This move’s another flow, this time from Camel Pose into Wheel Pose. It’s pretty advanced, so we recommend getting your form and confidence with both poses and gaining confidence in your quad strength before attempting it.
Step 1: Perfect Wheel Pose form
Let’s start with how to do a Wheel Pose from scratch:
- Start on your back. Flex your knees so that the soles of your feet are resting flat on the ground near your butt. Your feet should be hip-width apart and parallel to one another.
- Flex your elbows so that your palms rest against the floor beneath your shoulders.
- Inhale and press down, lifting your hips and shoulders off the floor slightly.
- Keep pushing. Let the top of your head rest against the floor, but avoid putting weight on your neck.
- Tuck your elbows in and, with one more push, lead with your chest as it rises toward the ceiling.
- Hold your pose for a moment.
Step 2: Exiting Wheel Pose
To exit the pose:
- Tuck your head so that your chin moves toward your chest.
- Slowly lower your arms and legs.
- Bring your knees together and rest.
Not easy, is it? Seriously, take your time perfecting this one before you go for the flow.
The flow: Moving from Camel to Wheel Pose
To achieve good form moving from Camel to Wheel pose, you’re effectively going from step 7 of Camel Pose (moving the heel of your hands to the heels of your feet) to step 4 of Wheel Pose (raising your abs to the starting position).
Try it like this:
- Start on your knees, with legs hip-width apart, your hands on your hips, and your thumbs against the base of your spine
- Raise up, aligning your hips above your knees. You want a straight vertical line from your crown to your kneecaps.
- Tuck your toes underneath your feet.
- Inhale, bring your elbows together, and move your hands back to your heels.
- As you allow your chest to open and rise, place those palms flat against the floor and begin walking them backward into Wheel Pose.
- Hold for a few breaths. Really feel that stretch.
- Exit the pose by walking your hands toward your body again.
- Exhale and, leading with your chin, return to the starting position.
That seems like some serious yoga yikes. But we absolutely believe you can smash out the perfect form with enough practice. #BendyBoi
Don’t worry if you aren’t feeling those sweet Camel Pose benefits overnight. It’s tricky to truly master, but you can speed up progress by observing a few handy pointers.
1. Take it easy on your lower back
Remember to lead with your upper body.
It feels tempting at first to rest a lot of weight on the lower back, but this can risk discomfort or injury. Instead, imagine that your lower body is rooted, and it’s your ribs, shoulders, and chest doing the hard work.
2. Keep your hips aligned
If your hips move too far forward or back, you’re either not getting the full benefit of the exercise or you’re risking straining yourself. Focus on keeping your knees correctly spaced from the start. Make sure your hips are aligned above your knees when you raise your body.
Pay attention to how your body moves as you enter the full extension. If you find yourself overextending or not extending the hips enough, make a conscious note to correct it.
3. Tuck in the Buddha belly
A lot of people let their gut go when they first start learning Camel Pose. Bad idea. If you don’t engage your abs, it means your lower back is taking too much weight.
You can modify the exercise to either ease yourself into it or level up.
To fix this, move some tension to the front of your hips. This can help your abs get involved naturally.
If you’ve mastered the Camel Pose, you’ve moved beyond the rank of yoga newbie. It’s a challenging position that tests balance and stability, on top of requiring an unexpected level of quad strength.
But yoga is all about combining elements toward a positive purpose. Take joy in all the different skills that come together for this pose to work, and pat yourself on the back for nailing them.