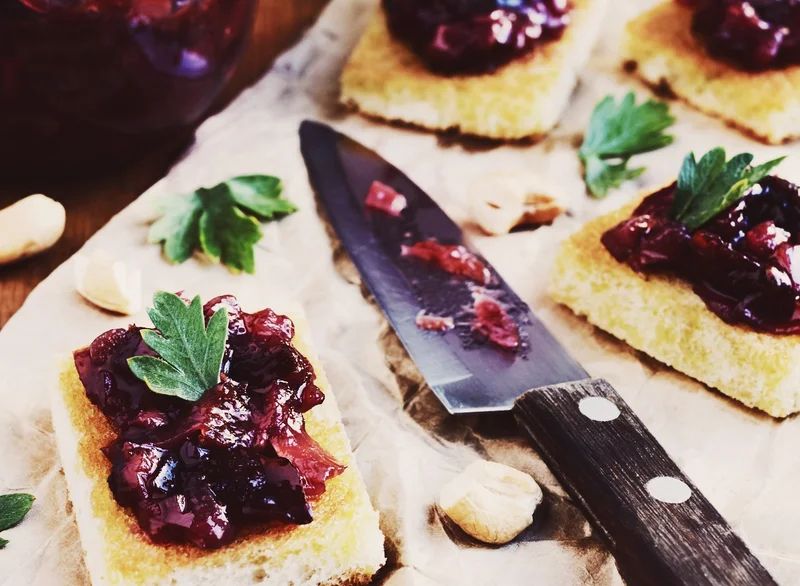
The ideal chutney balances sweet, spicy, and savory, and that’s what we’ve done with this plum version. The mustard seed and currants play off each other for a condiment that’d dress up anything from grilled chicken to a pan-seared pork chop.
You can, of course, make this recipe without canning it—just be sure to use or eat it within a week. If that’s an unrealistic venture, use the tips and instructions below to can the chutney.
Special equipment: We’re assuming that you already have basic tools lying around (like cutting boards, bowls, and measuring cups), so here’s the special equipment you’ll need for canning:
- 6 (4-ounce jelly jars)
- 6 lids with sealing compound for 4-ounce jelly jars
- 6 bands for 4-ounce jelly jars
- Boiling water canner or 15- to 20-quart pot with a tightfitting lid
- Canning rack that fits inside the boiling water canner or 15- to 20-quart pot
- Thin, flexible rubber spatula
- Jar lifter
- Deep frying/candy thermometer
Game plan: General canning tips: Before you turn on the heat, be sure to do the following: Read the recipe through, gather all necessary equipment, and check that you have the right amount of each ingredient on hand.
Give all your equipment a once-over: Examine your canning jars for nicks, cracks, uneven rims, or sharp edges that may prevent sealing or cause breakage; check that the lids have no dents and that the sealing compound is even and complete; and check that the bands fit properly.
Finally, have your jars, lids, and bands already sanitized before you start, and prepare only enough for one canner load at a time.
Chutney-specific tips: Select fresh plums at their peak, and use firm, uniform-size produce free of any cracks, spots, or growths.
This recipe was featured in our canning story.
- Yield: 6 (4-ounce) jars
- Difficulty: Easy
- Total: 1 hr 35 mins, plus 12 hrs cooling time
- Active: 35 mins
Ingredients (8)
- 8 plums, coarsely chopped (about 1 1/2 pounds)
- 1 medium red onion, coarsely chopped (about 6 ounces)
- 3/4 cup packed light brown sugar
- 1/3 cup dried currants
- 1/4 cup apple cider vinegar
- 2 large garlic cloves, sliced paper thin
- 1 teaspoon mustard seed
- 1/2 teaspoon kosher salt
Instructions
For sanitizing the jars and lids:
- Wash the jars, lids, and bands in hot, soapy water. Rinse well. Dry the lids and bands, and set aside.
- Place the jars in a boiling water canner or a 15- to 20-quart pot fitted with a canning rack and a lid. Fill the pot with water and bring to a boil over medium-high heat. Boil for 10 minutes, then turn off heat.
- Keep the jars in the hot water until ready for use, removing one at a time as needed.
For the chutney:
- Combine all ingredients in a medium saucepan and bring to a boil over medium heat.
- Let cook, stirring occasionally, about 30 minutes, or until reduced by 1/3. Continue cooking, stirring frequently to make sure chutney does not burn, until chutney is syrupy, another 10 minutes.
- When chutney is ready, remove the jars from the hot water with a jar lifter, letting excess water drip off. Bring water in the canner back to a simmer (about 180°F) for processing the packed jars.
- Remove chutney from heat and fill the sterilized jars, leaving a 1/2-inch headspace.
- To remove any air bubbles, slide a clean rubber spatula down the side of each jar and press inward on the chutney while rotating the jar; repeat 2 to 3 times for each jar.
For processing the packed jars:
- Wipe the rim and threads of each jar with a clean, damp towel. Place the lids on the jars, checking that the sealing compound is centered. Fit the jars with bands and tighten just until resistance is met.
- Check that water in the pot or boiling water canner is at a simmer (about 180°F), and set the jars in the canning rack. (The jars must be covered by 1 to 2 inches of water. Add additional boiling water as necessary.)
- Cover the pot with a tightfitting lid and bring to a rolling boil over medium-high heat. Process the jars for 10 minutes at a gentle but steady rolling boil. (Begin calculating the processing time once water is at a rolling boil. Check occasionally that water remains at a steady boil.)
- Once processed, remove the jars with the jar lifter and set upright, 1 to 2 inches apart, on a dry towel. Do not retighten the bands; let cool at least 12 hours.
- After the jars have cooled, check for a seal by pressing the center of each lid. If the center is concave and does not flex, remove the band and try to lift off the lid with your fingertips (don’t pull too hard). If you cannot lift the lid, there is a good vacuum seal. If the lid pops off, your jar did not properly seal. Eat the chutney within two months.
- To store properly processed jars, wipe each lid and jar with a clean, damp cloth (the bands don’t need to stay on for storage), label the jars, and store them in a cool, dry, dark place. Unopened jars can be kept up to a year when stored properly. Once opened, keep in the refrigerator and use within two months.