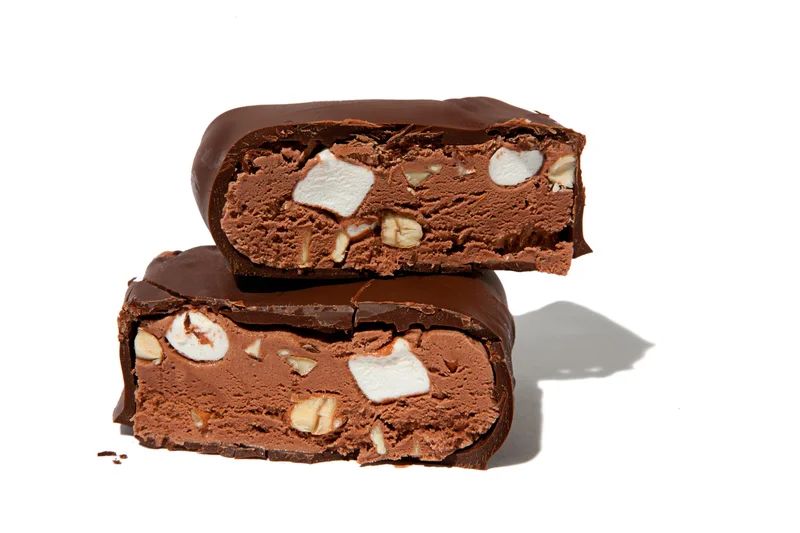
Rocky Road ice cream—chocolate ice cream with nuts and marshmallows—was conceived during the Great Depression to give people something to take their minds off their own “rocky roads” being traveled. Today, it’s simply the perfect textural combo of pillowy marshmallows and crunchy nuts that people love no matter what the economic climate. Form it into bars and cover it in chocolate and you’ll have an ice cream bar suitable for any market, bear or bull.
Special equipment: For coating the bars in chocolate, you’ll need a kitchen scale and a chocolate thermometer.
What to buy: If you prefer to buy rather than make your own ice cream, be sure to get a dense, rich variety. Because higher-quality ice creams contain less air, they freeze into solid, slow-melting blocks that are easier to coat with the melted chocolate. Lower-quality ice creams are fluffed up with air and will melt before the chocolate coating sets. Look for brands labeled premium or super-premium, such as Häagen-Dazs or Double Rainbow.
Professional pastry chefs use a type of chocolate known as couverture, which sets up nicely because it contains more cocoa butter than regular chocolate. The only trick is, you need to temper it. For this recipe, we used E. Guittard 61% Cacao Semisweet Chocolate Wafers; they can be found at specialty grocery stores and online.
Game plan: Tempering the chocolate ensures a snappy coating, but for a quicker alternative, dip the ice cream squares in our Chocolate Shell Ice Cream Topping. The chocolate won’t have the same snap, but the flavor will be the same. Double the recipe so that you have plenty of coating to cover all the bars.
In our experience, it’s best to either avoid tempering chocolate on a hot day or work in an air-conditioned space. Chocolate behaves best at a room temperature between the mid-60s and low 70s. Also, chocolate stays in temper for only a short time, so have everything ready to go and work quickly.
See more recipes for homemade ice cream bars here
- Yield: 9 (3-inch-square) bars
- Difficulty: Medium
- Total: 7 hrs 45 mins
- Active: 45 mins
Ingredients (4)
- 2 pints (4 cups) premium or homemade chocolate ice cream, softened until just spreadable but not melted]]
- 1 cup whole almonds or walnut halves, toasted and coarsely chopped
- 1 cup mini marshmallows
- 2 pounds semisweet chocolate couverture or coarsely chopped semisweet chocolate
Instructions
- Line a 9-by-9-inch baking pan with plastic wrap, overlapping as needed to completely cover the bottom and sides and leaving at least a 5-inch overhang. (If possible, use a pan that does not have sloping sides.)
- Place the ice cream in a large bowl and add the nuts and marshmallows. Working quickly, fold the nuts and marshmallows into the ice cream with a rubber spatula until evenly combined.
- Drop the ice cream in large dollops into the prepared pan and spread to the edges with a rubber spatula. Cover with the overhanging plastic wrap and press on the surface of the ice cream with the bottom of a measuring cup until it’s packed into a smooth, even layer. Freeze until solid, at least 3 hours.
- Meanwhile, line 2 baking sheets with parchment or waxed paper. Tape each corner of the paper down and place the baking sheets in the freezer.
- 5When the ice cream is solid, remove the pan and 1 baking sheet from the freezer. Grasping the plastic wrap, pull the ice cream slab out of the pan and place it on a cutting board. Remove and discard the plastic wrap. Slice the slab into 9 even squares.
- Using a flat spatula, transfer and evenly space the squares on the baking sheet. Freeze until solid, at least 2 hours.
- Fill a large bowl with 2 inches of cold water, add 3 to 4 ice cubes, and set aside.
- Bring a medium saucepan filled with 1 to 2 inches of water to a simmer over high heat; once simmering, reduce the heat to low and maintain a bare simmer. Place 24 ounces of the chocolate in a large, dry, heatproof bowl. Set the bowl over the saucepan and stir with a rubber spatula until the chocolate is completely melted and has reached 118°F. (Make sure the chocolate does not come into contact with any water or exceed 120°F. If either happens, start over, as the chocolate is no longer usable.)
- Remove the bowl from the saucepan. Add the remaining 8 ounces of chocolate and stir constantly, scraping against the bottom of the bowl, until all of the chocolate has melted and the temperature has cooled to 80°F. To speed the cooling process, after all of the chocolate has melted you can place the bowl over the reserved cold-water bath.
- Return the bowl to the saucepan and stir until the chocolate reaches 88°F; immediately remove from heat. Do not remove the thermometer from the bowl; check the temperature periodically to make sure it stays between 87°F and 89°F. (The chocolate must remain in this temperature range or it will not set up properly.) Keep the saucepan over low heat and use it to reheat the chocolate as necessary.
- To test if the chocolate is properly tempered, spread a thin layer on parchment or waxed paper and place it in the refrigerator for 3 minutes to set. If the chocolate hardens smooth and without streaks, it is properly tempered. (If it is not properly tempered, let the melted chocolate harden and start the tempering process over again: Bring the chocolate up to 118°F, then down to 80°F, then up again to 88°F.)
- Have a fork and flat spatula ready. Remove the empty baking sheet and the baking sheet with the ice cream squares from the freezer. Working quickly, use the flat spatula to drop 1 ice cream square into the chocolate. Using the fork, flip the square, making sure the edges are covered in chocolate. Lift the square out of the chocolate with the fork and tap the fork several times on the edge of the bowl to even out the coating. Scrape the bottom of the fork against the edge of the bowl to remove any excess chocolate. Place the coated square on the empty baking sheet. Repeat with the remaining squares and chocolate, tilting the bowl as needed to pool the chocolate in one area, and spacing the squares as close together as possible on the baking sheet without touching. (If the ice cream squares start to melt, return them to the freezer until firm before continuing.)
- Freeze the dipped ice cream bars until the chocolate coating has hardened and the ice cream is solid, at least 2 hours. Wrap them individually in plastic wrap, then foil, and store in the freezer for up to 2 weeks.