
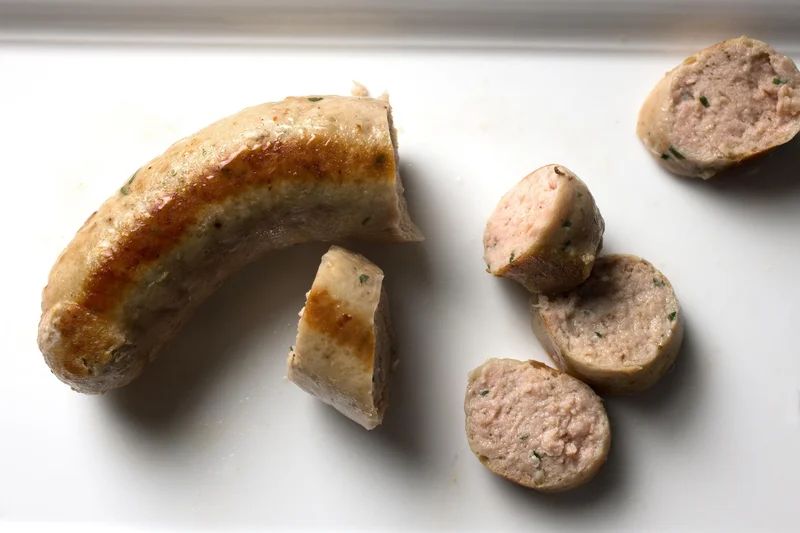
Like bratwurst, this sausage is made with a mix of veal and pork. But unlike bratwurst, it’s made with a larger proportion of veal than pork and is flavored with delicate chives and the warm spice flavor of ground cloves. Traditionally served with bock beer in the spring, bockwurst is now one of the main sausages served during Oktoberfest. Many takes on it are smoked, but we made it fresh for ease and because we like how it preserves the sausage’s subtle flavor.
What to buy: There are several types of veal on the market, so be sure to ask your butcher for milk-fed veal from calves 12 weeks or younger. This creamy, white, fine-grained meat will lend the best flavor and texture to the sausages.
Special equipment: You’ll need a grinder and a stuffer in order to make sausage. We’ve used various types in the past, but this recipe was tested using the special attachments for a KitchenAid stand mixer.
Game plan: If you choose to wear latex gloves, replace them with a fresh pair after each grind of meat and before stuffing the casing. Be sure to keep the meat and equipment ice cold during every stage of the process—it reduces the risk of food-borne illness and makes the stuffing process less cumbersome.
You may be tempted to cook up your sausages right away, but aging is important to developing the flavor, so don’t skip this final step.
This recipe was featured as part of our Make Your Own Sausage project.
- Yield: 20 sausages
- Difficulty: Hard
- Total: 3 hrs 15 mins
- Active: 2 hrs
Ingredients (12)
For the casings:
- 10 feet medium hog casings
For the filling:
- 3 pounds veal shoulder
- 1 1/2 pounds pork shoulder
- 1/2 pound pork fat
- 1/2 cup minced white onion
- 1/4 cup finely chopped fresh chives
- 1/4 cup finely chopped fresh Italian parsley
- 1/4 cup kosher salt
- 3/4 teaspoon ground clove
- 1 teaspoon freshly ground white pepper
- 2 cups cold whole milk
- 4 large eggs, lightly beaten
Instructions
For the casing:
- Find the end of the casing, measure about 10 feet, and cut. If the casings were packed in salt, rinse thoroughly. Place in a bowl of tepid water and soak for 30 minutes. Discard soaking water, rinse the insides of the casing with running water, and soak in fresh tepid water at least another 30 minutes. Meanwhile, start making the filling.
For the filling:
- Place a baking sheet, 2 large mixing bowls, the stand mixer bowl, the paddle attachment, the grinder attachment, and the coarse grinding plate (1/4 inch) in the freezer until very cold, at least 30 minutes.
- Meanwhile, trim the veal and pork shoulders of any excess fat, gristle, tendons, glands, silver skin, or blood vessels. Cut the veal, pork, and pork fat into 1-inch pieces and mix to evenly combine. Arrange in a single layer on the frozen baking sheet and place in the freezer until stiff but not frozen solid, about 45 minutes to 1 hour.
- When the meat is ready, attach the frozen grinder attachment to the mixer. Push the chilled meat to one side of the baking sheet. With the mixer on medium speed, grind the meat by the handful onto the empty side of the baking sheet. (The meat should easily pass through the auger and grinding plate. If it appears to stick to the front of the grinding plate, disassemble the grinder and clean out any tendons or fat that may be entangled in the blade.) Arrange the ground meat in an even layer and place it back in the freezer until stiff but not frozen solid, about 30 minutes. Meanwhile, clean the grinder attachment and pieces and place them back in the freezer. Place the spices in a medium bowl and mix to evenly combine; set aside.
- When the ground meat is ready, reattach the frozen grinder attachment to the mixer. Sprinkle the spice mixture evenly over the meat and grind half of the meat mixture on medium speed into one of the frozen bowls; place in the freezer. Grind the other half into the frozen stand mixer bowl.
- Remove the grinder attachment from the mixer, attach the frozen paddle attachment, and attach the stand mixer bowl to the mixer. With the mixer on low speed, slowly add 1 cup of the milk and 2 of the eggs to the meat and mix until just incorporated. Increase the speed to medium and mix the filling until the fat is well incorporated and the mixture appears sticky, about 3 to 5 minutes. Remove to the second frozen bowl and place in the freezer. Transfer remaining filling to the stand mixer bowl and repeat the paddling step with the remaining 1 cup milk and 2 eggs. Add to the bowl of filling already in the freezer. Clean the grinder attachment and place it back in the freezer. (You will no longer need the grinding plate.)
- Meanwhile, check the meat mixture for proper seasoning by forming a small, thin patty. Pan-fry until the center is no longer raw. Taste it, keeping in mind that the flavor will develop as the sausage sits, or ages; add additional seasoning to the ground meat as desired.
To stuff the sausages:
- Attach the cleaned, chilled grinder attachment fitted with the large stuffer tube to the mixer. Place a baking sheet in front of the stuffer tube and moisten it with water (this will help the sausage coil more easily). Remove the filling from the freezer and, with the mixer on low, push enough filling into the feeding tube using the stuffer tool until the filling is just visible at end of the tube (this keeps air from being pushed into the end of the casing before the first sausage). Place the filling back in the freezer.
- Moisten the stuffer tube with water. Dip the end of the casing in water to create a small water bubble and begin feeding the casing onto the stuffer tube with one hand while holding the casing with the other hand to keep the water bubble level with the stuffer tube. Leaving a few inches of casing slack in between your hands, feed all but a few inches onto the stuffer tube. Let any water drain out of the casing, then tie the end in a knot.
- With the mixer on medium speed, begin to stuff the casing by feeding golf-ball-sized handfuls of filling down the tube using the stuffer tool, adding more filling as it packs the casing. (You may feel some suction in the stuffer tube—using small handfuls of filling and allowing the attachment to become coated with filling keeps this to a minimum.) Make sure the filling is firmly and evenly packed but not stretching the casing. Leave enough vacant room for sectioning off the sausages. Continue to stuff the casing until all the filling is gone.
- Push any remaining casing off the stuffer tube, leaving at least 1 to 2 inches of empty casing from where the sausage ends, and tie it off with a knot. Cut off any remaining casing with kitchen scissors and discard. (You should now have one long, coiled sausage.) Gently run your hand down the length of the casing to evenly distribute the meat.
- Pinch the sausage about every 5 inches to demarcate the links. Beginning at one end, twist the first and third links in the same direction about 3 times. Continue to twist in this manner until all the links have been sectioned off. Cut the sausage links with kitchen scissors at the twisted joints. If any air bubbles appear, prick them with a clean, sharp pin or knife tip.
- Refrigerate the sausages in a single layer covered with plastic wrap or in an airtight container. Let them age at least 2 to 3 hours before cooking and eating. Use fresh refrigerated sausages within 3 days, or freeze sausages individually wrapped in plastic for 2 to 3 months. The sausages can either be roasted at 450°F for 15 to 20 minutes or pan-fried over medium heat for 20 to 25 minutes.