We include products we think are useful for our readers. If you buy through links on this page, we may earn a small commission. Here’s our process.
Greatist only shows you brands and products that we stand behind.
Our team thoroughly researches and evaluates the recommendations we make on our site. To establish that the product manufacturers addressed safety and efficacy standards, we:- Evaluate ingredients and composition: Do they have the potential to cause harm?
- Fact-check all health claims: Do they align with the current body of scientific evidence?
- Assess the brand: Does it operate with integrity and adhere to industry best practices?
FreshCoat is an ongoing series at Greatist that features easy, affordable DIY home projects, so you can add joy to your life by sprucing up your space.
A couple months ago, my friend Rachel moved into a new apartment in Brooklyn. Knowing I’d recently transformed my own bedroom with a colorful wall mural (the project that led me to launch my interior decor consulting business, Nestia,) she tapped me for help creating a similar project.
Her first post-college apartment, she wanted the space to feel personal, cozy, and high-end — while not breaking her budget. Having been in her shoes myself 6 years before, I could relate. It’s the time in your life when you’re ready to throw away those plastic storage drawers and invest in nice — nicer, at least — things. It’s when you finally want your living space to say, “an adult lives here!”
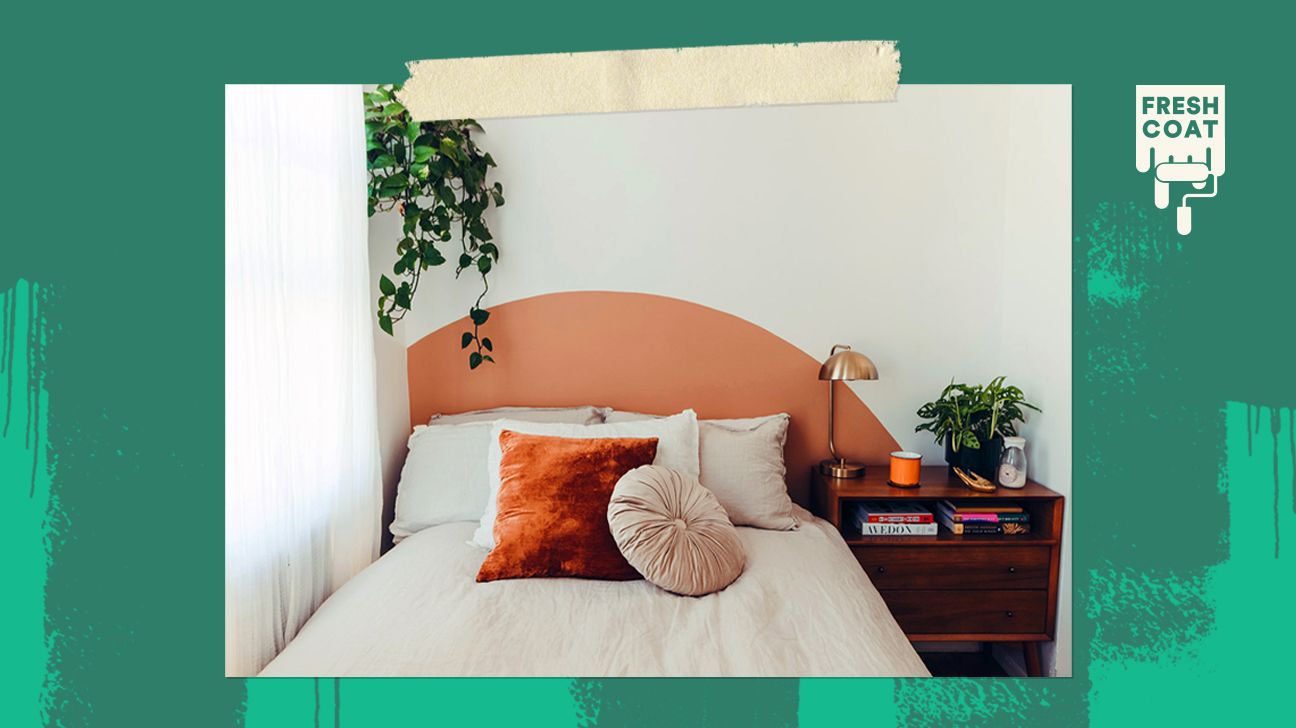
We talked through ideas that would reflect Rachel’s minimal, slightly Bohemian style while matching her furniture and many indoor plants. When I realized there was no art on her bedroom walls and no headboard over her bed, we had our project. I combined a mural and headboard, and I finalized Rachel’s room at the low cost of $30. Here’s a step-by-step breakdown of how I did it.
- Decide if it’ll work in your space. Will your bed placement work with an arch? Do you feel comfortable painting your walls? (If you’re renting, you can always paint over them before you move out.)
- Look for inspiration. This painted arch headboard project by Dream Green DIY sparked my desire to do this project.
- Choose a color scheme. Consider the other colors in the space. For example, I chose a contrasting color to Rachel’s burnt orange-colored pillow and green plants, but that also looked nice with her patterned rug.
- Decide on the shape of the arch. Are you going for a subtle design or something bolder? Rachel didn’t want her arch to overwhelm the room, so we chose a shorter height. Also, consider other nearby furniture, like end tables. It helps to sketch out your space and play around with different arch sizes.
Step 1: Make the measurements
First, I marked where the highest point of the arch would be. (I recommend doing this before you move the bed, so you know where it’ll be positioned on the wall.)
We wanted the arch to be symmetrical over her bed, so I needed to find the midpoint. I did this by measuring the width of her bed and divided that number in half. Next, I measured 18 inches above that point (the height we’d determined was ideal) and made a mark with a pencil.
Step 2: Tape off the areas and draw the outline
- After we moved the bed and end tables, I laid plastic down under the work area to protect the floor.
- Next, I taped off the edges. For Rachel’s room, the arch butted up against a wall, so I taped off that wall to make sure there would be a clean line. And, I also taped off the floor.
- To draw the line of the arch, I taped one end of a piece of string to the ground and the other end onto a pencil. I used the mid-point measurement from earlier as the ground point so that when I extended the string straight up, it created a center line from the ground to the highest point in the arch.
- From there, I could draw an accurate arch from the left wall to the bottom right floor.
Step 3: Paint
- Once I had the outline, I started to paint! I used the largest brush in the set to do the interior of the arch. It took three coats to get to the shade that worked for us. You’ll need to wait 1.5 hours or so for each coat to dry.
- Then, I touched up the edge line with one of the smaller brushes. Go slow here because it’s important to get a clean line.
- Once the paint was completely dry, I removed the painters tape slowly and helped Rachel move the furniture back in place. Voilà!
- I used 7.75 fluid ounces of Benjamin Moore Mountain Hideaway paint. This was a sample size and it was all we needed. But if your wall or bed is larger than this one, I would say go up to a quart size.
- painter’s tape
- multi-size paint brushes
- plastic drop cloth
Maggie Antalek is a New York City-based interior decor consultant and artist. Her business Nestia strives to bridge the gap between high-end interior design and low-budget DIY, making home design accessible to everyone. Follow her on Instagram (@nestiahome) or visit her website for more info at www.nestiahome.com.