
We include products we think are useful for our readers. If you buy through links on this page, we may earn a small commission. Here’s our process.
Greatist only shows you brands and products that we stand behind.
Our team thoroughly researches and evaluates the recommendations we make on our site. To establish that the product manufacturers addressed safety and efficacy standards, we:- Evaluate ingredients and composition: Do they have the potential to cause harm?
- Fact-check all health claims: Do they align with the current body of scientific evidence?
- Assess the brand: Does it operate with integrity and adhere to industry best practices?
Mister Fantastic. Stretch Armstrong. Elastigirl. Plastic Man. What do they have in common? Well, they’re fictional, for starters. But, also, they’re bendy as all heck.
Next time you’re in a yoga studio or watching the pros do it on YouTube, you may feel not bendy as all heck. But you know what? That’s fine. Yoga is about feeling comfortable and pushing yourself a touch.
If it hurts, you’re doing it wrong. So finding ways to make yourself feel better while partaking in exercise designed to make yourself feel better is absolutely fine.
We spoke to yoga teacher Jessamyn Stanley, author of Every Body Yoga: Let Go of Fear, Get On the Mat, Love Your Body, about how to adapt yoga poses to less bendy parameters.
Here, Stanley shows us 10 easy ways beginners can adjust the common yoga poses to ease themselves in.
You’ll need one or two blocks or a blanket for most of these moves. As you get stronger and more confident, progress to the full pose you see right below.
(We explain after this section why you need feel absolutely zero embarrassment about using blocks or blankets — you’re freakin’ awesome for trying to get involved in the first place.)
If you wondered how yoga can actually benefit you, look no further.
1. Cobra, or Bhujangasana
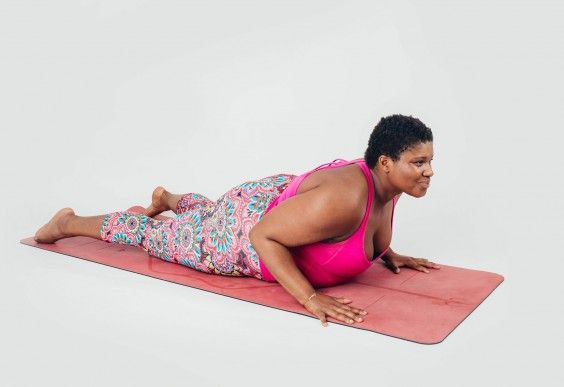
Start with the baby version, and let that snake grow into full, bendy adolescence. You can ease into cobra pose by increasing the strength and flexibility of your back with baby cobra.
- Start lying face-down on the mat, with your legs hip-width apart, your palms on the mat next to your ribs, and the elbows tucked in toward your body.
- On an inhale, draw your shoulder blades down your back, and pull your chest forward. You should be able to lift your hands off the mat, and you should feel most of the effort in your upper back, core, and legs.
- Keep your elbows bent and tight to the body, and gaze forward.
When you’re ready: From baby cobra, progress to this deeper version.
- Press your palms into the mat and lift your head and chest, drawing your ribs and belly away from the mat.
- Keep a slight bend in elbows and roll the shoulder blades back and down.
- Finally, lift your heart and gaze upward.
Back pain? Give these 15 poses a try.
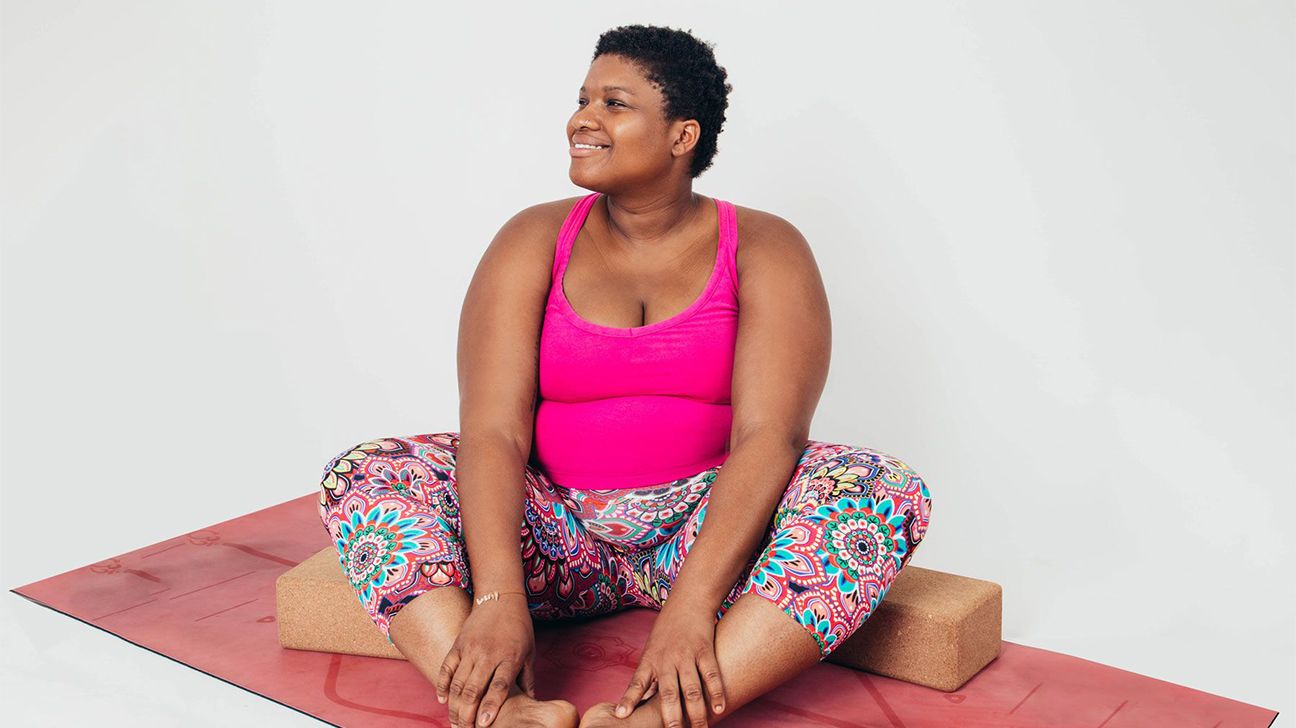
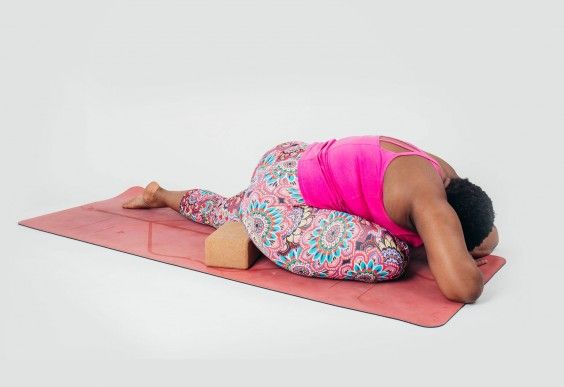
2. Bound Angle Pose, or Baddha Konasana
Giving your thighs extra support will allow them to melt into the blocks, making the stretch far less taxing.
- From a sitting position, bend your knees and bring the soles of your feet together, with your heels drawn close to the pelvis.
- Take two blocks and slide one under each knee for support. Grab hold of your big toes with your thumb and index fingers, and press the elbows into your inner thighs to draw your head to the floor and your belly to your feet.
- Try not to round your spine as you fold forward.
- Stay for several breaths, then gently roll back to your starting position.
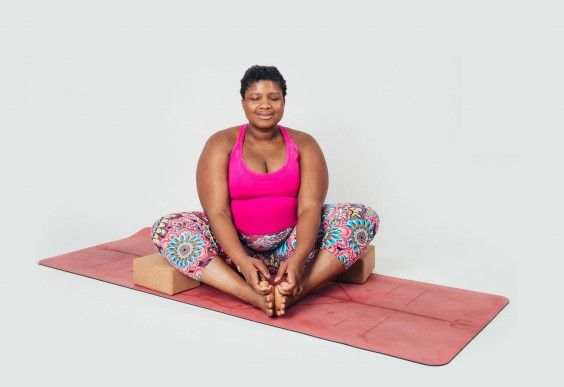
When you’re ready:
- Remove the blocks, and, instead, use your elbows as anchor weights for your legs.
- You can sink into the pose even deeper by drawing your head to the floor and your belly to your feet while pressing your sit bones into the mat.
- Be patient with this pose. Progress comes slowly. But when it does… oh, boy.
Meditation is so good for you. Here are 19 reasons why — science says so.
3. Downward-Facing Dog, or Adho Mukha Svanasana
This variation is particularly good for people with weak wrists.
- Start on all fours, with your shoulders stacked over your wrists and your hips over your knees.
- Place your hands on blocks in front of your shoulders.
- Curl your toes under, and lift the hips up and then back. Use the blocks as a weight stabilizer — these can help you find balance between your upper and lower body.
- Keep a slight bend in your knees if necessary but work toward straightening your legs and easing your heels to the mat by pushing them into blocks and shooting your hips up and back.
- Keep your arms straight, rotating the triceps in. You can place the blocks up against a wall for additional support.
When you’re ready: From supported Down Dog, remove the blocks to get deeper into the pose. The key to holding this pose without wanting to scream is clawing the mat, says Stanley.
To do this, plug into your fingertips and knuckles when you step into the pose to create a sort of suction cup with your hands. This protects your wrists, and keeps weight evenly balanced between the upper and lower body.
If you’re expecting, we found these prenatal yoga poses that may help.
4. Garland Pose, or Malasana
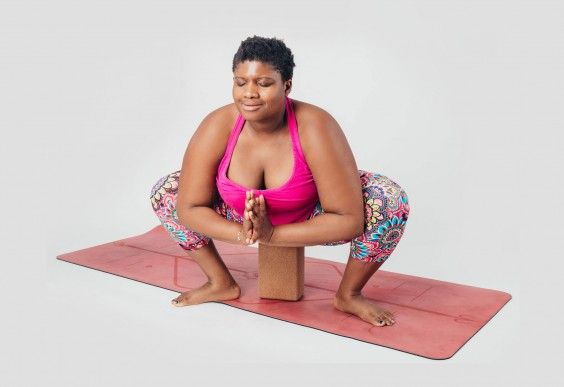
If your hips are tight or you have tender ankles or knees, grab a block and a blanket — this one is certainly not out of your reach.
- Start standing with your feet just wider apart than your hips. If necessary, slide a blanket under your heels.
- Spin your heels inward and toes out, then sink hips down into a deep squat. You can slide a block under your butt for support and turn the block on any side for three different heights. The taller the height of the block, the easier this becomes.
- Place your elbows on your inner thighs and press the palms together to draw your heart forward.
When you’re ready:
- Remove the blanket, block, or both to sink into the deepest form of this pose.
- Stay for a few breaths.
- Rise up to a standing position, shaking your hips out if necessary.
Confused about the lingo? We’ve got the ultimate breakdown of yoga words.
5. Warrior III, or Virabhadrasana III

This pose is a test of your balance, but you can work on it over time.
- Place two blocks at any of their three heights about 8 inches in front of your toes.
- Step forward so that your right foot is directly in between the blocks.
- Transfer your weight to the left foot and kick your right foot straight up and back from between the blocks until it’s about parallel with floor. Be sure to flex through your toes, and don’t let all your weight fall into the blocks.
- Slightly bend the raised right knee for balance, if necessary.
- Then, repeat these steps on the other leg.
When you’re ready:
- When you feel steady, remove the blocks.
- Without letting your right leg fall, press those palms together in front of your chest to drive your heart forward.
- Then, hold your gaze forward, keeping your neck relaxed.
- If you’re feeling really ambitious, extend your arms straight back.
- Hold it for a few breaths, then return to a standing position.
If you’re more of an apps person than a turn-up-to-a-class person, we’ve got you.
6. High plank, or Utthita Chaturanga Dandasana
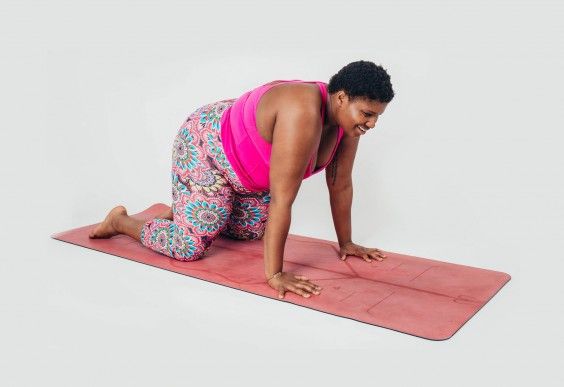
Before building up to a high plank, try a Tabletop Pose.
- Start on all fours with your shoulders stacked over your wrists and your hips directly over your knees.
- Spread your fingers wide. This helps evenly distribute your weight in your hands.
- Engage your triceps, release any tension in neck, and gaze just beyond your fingertips.
- Practice pushing the ground away and rounding your upper back to feel more sturdy and lifted.
When you’re ready:
- Once solid, start curling your toes under and slowly stepping your legs straight back into a high plank.
- Stay on the balls of your feet with your core lifted and shoulders engaged.
- Remain there for a few breaths then return to all fours.
These are the best yoga mats you can buy in 2020.
7. One-Legged King Pigeon Pose, or Eka Pada Rajakapotasana
This can really help stretch out those legs and needn’t be that difficult for beginners.
- Start in a high plank position, with your shoulders over your wrists and your hips in line with your shoulders.
- Draw your right knee to your right hand and right foot to left hand, resting outside of shin on mat as you roll over left toes. Try to get your shin as parallel as possible to the short edge of the mat.
- Square your hips and keep the right foot flexed. Grab a block and place it under your right hip for support.
- Sit upright, with your hands on the floor for support (if that’s enough to feel comfortable). Alternatively, fold forward over your front leg and relax your forehead to your the mat.
- Relax the shoulders and breathe into the stretch in your hips.
- Repeat on the other side.
When you’re ready:
- As your hips begin to open, remove the block.
- Try sliding your front foot farther away, so that your shin stays parallel with the short edge of mat.
- Keep sinking right hip into mat for several breaths. Repeat on other side.
We found the perfect beginners’ yoga flow.
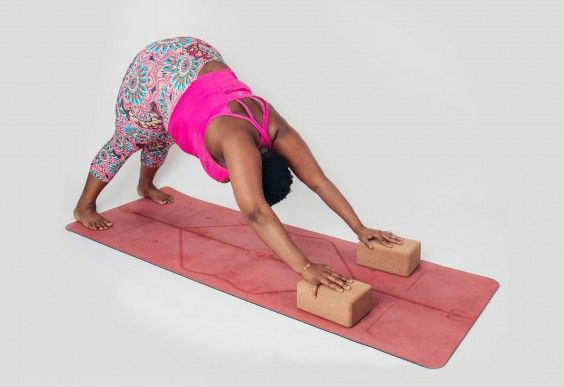
8. Standing Half-Forward Fold, or Ardha Uttanasana
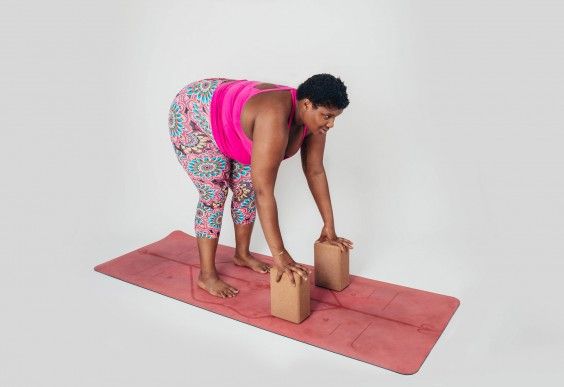
Oooooooof. Give that back and the backs of your legs a good ol’ stretch.
- Start standing, with your feet hip-width apart.
- Place two blocks (at any height) about 8 inches in front of your toes.
- Fold forward as you exhale and place your hands on the blocks.
- Extend your spine, chest, and gaze forward.
- Push into the blocks to lengthen your spine, and let the tension in your upper back melt away.
When you’re ready:
- Remove the blocks.
- Keep your weight stacked in heels and add a slight bend to knees if necessary.
- Reach your fingertips to the mat as you draw your heart forward.
- Keep the spine long and your shoulders relaxed.
Prefer your yoga a little… hotter? We’ve got you covered.
9. Tree Pose, or Vrksasana
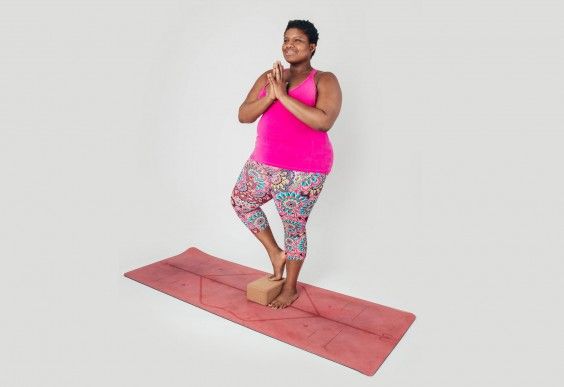
A block’s great when tree’s a crowd.
- Start standing and place a block (at any height) next to your left ankle.
- Shift your weight to the left leg and turn your big toe into the “root” of the tree, providing stability.
- Lift your right foot, bend the knee, turn out from the hip, and rest your right ankle on your left leg.
- Stand tall, and bring your palms to touch in front of your heart as you sweep your gaze upward.
- Repeat this on the other side.
When you’re ready: Remove the block and lift your right foot to your left ankle or mid-shin. Alternatively, grab your inner right ankle and bring the sole of the foot to your left shin or upper thigh.
Pro tip: Never rest your foot on your knee.
It might help you maintain balance if you actively press your right foot and left leg into each other.
10. Half Moon, or Ardha Chandrasana
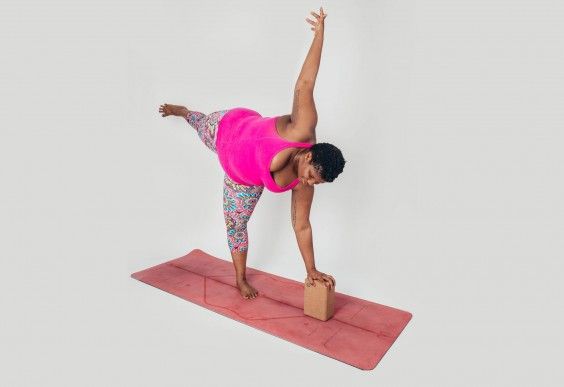
This can be a super tricky position without support, requiring a heck-ton of balance. The “When you’re ready” part of this really is about waiting until you’re ready.
- From a standing position, place a block (at any height) about 8 inches in front of your right toes.
- Shift your weight into the right leg and lean to the right, until the right hand rests on the block, the left leg lifts straight up, flexing through toes, and your left hand extends toward the ceiling (if this is a lot, check the picture above).
- Keep your chest open (i.e. not facing the mat) and your shoulders stacked on top of each other. Press into your right big toe for balance. If necessary, slightly bend the right knee.
- Repeat this on the other side.
When you’re ready:
- Remove the block and reach your fingertips or palm all the way to the mat. If necessary, you can bend your knee slightly to reach the mat.
- Try to look up along your raised arm if possible.
- Stay for a few breaths (and get up if you’ve fallen over, because that’s also totally OK).
- Repeat on the other side.
We rounded up the best yoga pants you can get in 2020.
There you have it. Yoga is about what makes you feel centered. So adapting these poses to ease you into the fuller, more demanding poses is no crime against your instructor at all.
However, if no one else at your group session has a block or a cushion with them, it can feel awkward or even embarrassing to use one.
But those worries are all in your head — even yoga teachers like Jessamyn Stanley use blocks.
“Personally, I used to always look down on using props because I felt like, ‘Oh, I’m not good enough,'” says Stanley.
“But then I realized that’s just my ego getting in the way. And the ego is something you’re trying to walk away from anyway. So if you just say, ‘I want to have the best practice possible, it doesn’t matter what tools I’m using,’ then you’re always going to get what you need.”
So the next time you feel yourself reaching for a prop, take Stanley’s advice: “Don’t be mad at yourself.” That’s just where your body is at in that moment.
“If you are using a block, that’s not a sign of weakness,” confirms Stanley, “it’s actually a sign of power — that you know that your body just needs to be a little bit longer, just needs a little bit of stabilizing, and when you’re using the props, you’re actually giving yourself even more reinforcement.”
Some people are put off from starting out and feel intimidated by the flexibility of the pros. But Stanley shows it really needn’t be that way, and anyone can introduce themselves to the mental and physical benefits of yoga.
We put together a guide to several different types of yoga you can try.
Yoga can feel like a lot to get to grips with. However, there are plenty of approaches and levels of difficulty, even within a single class.
If you try and push yourself too far too quickly, you won’t see the benefits. So ease yourself in with these methods, and don’t embarrassed by using a block or blanket.
Here are 30 basic yoga poses to get you started on your journey. Namaste!