The only reason to name an exercise after a gaseous explosion of digestive tract air? Well, because after doing a dozen of them, you feel like you’ve got a bout of indigestion.
Kidding! The burpee exercise isn’t named after mouth farts. It’s named after Royal H. Burpee (I sh*t you not!).
And while it does do a number on your entire bod, you’ll want water afterward, not Pepto. Promise!
Now that that’s out of the way, read on for your guide to the movement that’s as hard and humbling as it is efficient and effective.
How to do a burpee correctly:
- Stand with feet shoulder-width apart, arms down by your sides.
- Brace midline, then bump your butt back and bend your knees to lower into a squat.
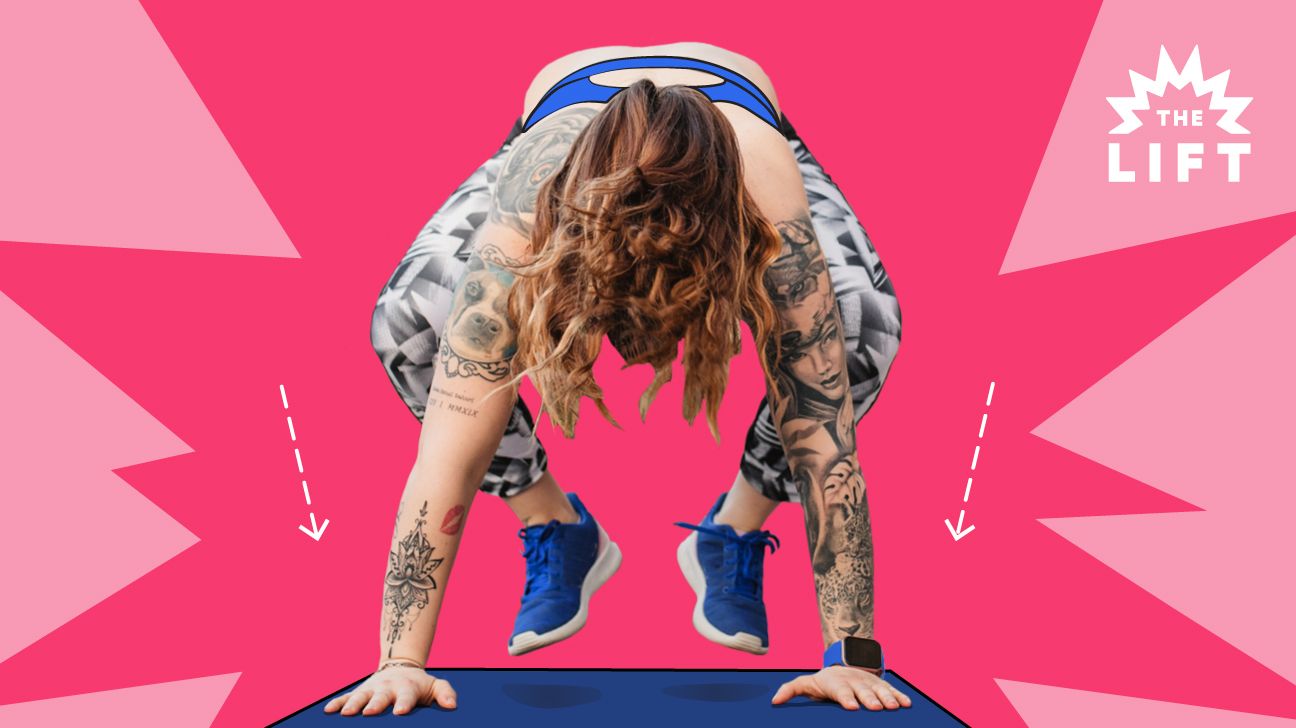
- Plop palms onto the floor ahead of you, just outside feet.
- Shift weight into hands as you jump feet back into a high plank position, landing on the balls of your feet.
- Double-check that core is braced. Then, keeping elbows locked into rib cage, lower into a push-up.
- Press into palms to push back up to a high plank position.
- Jump feet up to either side of hands.
- Explosively jump up, clapping hands overhead.
It turns out the burpee isn’t quite the foolproof movement it’s sold as.
“The burpee is so easy to get wrong,” says certified strength and conditioning coach Mia Nikolajev, who also competes in powerlifting. “Throwing your body onto the ground and hoping for the best just isn’t a recipe for staying safe.”
Do your body a favor and follow these form tips closely.
1. Brace your midline
The entire time. During every(!) single(!) rep(!).
“It’s especially important to brace your midline when you transition into and out of the high plank,” says Philadelphia-based trainer Mike Watkins, founder of Festive Fitness. “Failure to do so can put your spine in a compromised position.”
The recommendation to avoid a sore lower back: Slow down.
When you pop back into a high plank, pause and think about pulling your belly button into your spine. Then (and only then!) move on to the push-up.
At the bottom of the push-up, double-check that your core is cinched, and then press back up to a high plank again. You should be able to draw a straight line connecting your head to your heels this entire time.
If you take video of yourself doing a burpee and you look like you’re doing Upward-Facing Dog, it’s a sign your core wasn’t engaged.
2. Let your body dictate where your feet go
Generally, your feet should be hip-width apart when you’re in a high plank position — including in the middle of a burpee. But Watkins suggests widening your feet if you’re bigger-bodied or you have preexisting knee or ankle injuries.
“Placing your feet beyond the width of your shoulders will give you a bigger, more stable base,” he explains.
3. Check your hand placement
Pro tip: Halfway through a burpee, you have to do a push-up. Not a Superman. And not a diver’s pose.
In other words, instead of placing your hands above your head, you want them planted directly under your shoulders. Your shoulders will be angry at you otherwise.
4. Prepare your wrists ahead of time
Even if you’re planning to do burpees correctly, Nikolajev recommends doing a few wrist drills beforehand. These could include:
- wrist rolls
- prayer stretch
- backward kneeling leans
- forward kneeling leans
- sideways kneeling leans
“People with desk and computer jobs are especially likely to have tight wrists that need to be warmed up ahead of time,” she says.
5. Actually engage your muscles
During the push-up portion, you want your elbows tucked close to your body, not flared out like wings.
But, Nikolajev warns, “You want to make sure you’re contracting the muscles that control the joints rather than just ramming your joints into position.” Hello, elbow injury.
So, when you hit the deck, think about screwing your pinkies into the floor, juicing grapes between your shoulder blades, and pulling your elbows and toes toward each other. That will actively engage your triceps and lats.
6. Breathe
While it’s never a good idea to hold your breath when you exercise, considering that your heart rate will be sky-high by rep 3, it’s especially important to breathe during burpees.
Try inhaling at the top and exhaling when you shoot your legs back into a high plank. Inhale at the bottom of the push-up, and exhale as you explode your feet back up to your hands.
If you’re moving Dash-fast (that’s an “Incredibles” reference, BTW), you may need only 1 breath per movement. And if you’re moving slow and steady, you may need 3 breaths. So, experiment with what works for your lungs.
Note: Work your way up to standard burpees
Watkins recommends getting comfortable with the individual exercises in the burpee (the push-up, high plank, and jump squat) before putting them all together.
If you can do 5 push-ups, hold a plank for 20–30 seconds, and hit 5–10 jump squats, you’re ready to try burpees.
Yes, they’re hard, but they’re also really good for you.
Full-body workout
According to Watkins, burpees don’t discriminate when spreading the workout wealth.
“Burpees work your chest, triceps, core, shoulders, glutes, quads, calves, and hips,” he says. “When done correctly, they are a true full-body movement.”
Cardiovascular challenge
It might sound scary, but in this case, challenging your cardiovascular capacity is a good thing.
“Any time you’re changing planes of motion, it’s going to spike your heart rate and give your cardio a boost,” says Nikolajev. “And burpees — which require you going from laying down (bottom of a push-up) to standing/jumping up over and over and over again — do just that.”
Increased explosiveness
“If you do a standard burpee where you hop out into a plank, hop in and then jump to stand up, it’s a plyometric exercise,” says Nikolajev.
Plyometrics can help you:
- run faster
- jump higher
- become more agile
Hey, athletes, these perks (^) are especially beneficial to you.
Zero equipment required
Even if that boitch Rona has shut the doors on your go-to fitness studio, it can’t stop you from burpee-ing as much as you want.
You betcha.
You could just go faster. But when you’re going as fast as you can, Nikolajev says, form tends to falter.
So, if you’re feeling extra ambitious, you’ll get a bigger bang for your buck burpee by doing one of the following instead:
- adding a second push-up at the bottom of the burpee
- adding a hand release at the bottom of the push-up
- doing a tuck jump after every burpee
Can you do burpees when pregnant?
There’s no universal rule for working out while pregnant, but generally, standard burpees are considered safe through the end of the first trimester. After that, it all comes down to what you’re comfortable with and what your doctor deems safe.
If burpees are out, squat thrusts (burpees without the push-up) are a good sub. Ditto for air squats and wall push-ups.
“There are many other full-body exercises that get your heart rate up,” says Nikolajev.
Some alternative options:
- inchworms
- jump squats
- kettlebell farmers walks
- mountain climbers
- weighted squats
- deadlifts
So, if you’ve always wanted to film yourself doing an epic training montage that includes burpees (or if you just enjoy them), have at it! But if not, that’s A-OK.
Remember, you have control over your workout goals.
Gabrielle Kassel (she/her) is a queer sex educator and wellness journalist who is committed to helping people feel the best they can in their bodies. In addition to Healthline, her work has appeared in publications such as Shape, Cosmopolitan, Well+Good, Health, Self, Women’s Health, Greatist, and more! In her free time, Gabrielle can be found coaching CrossFit, reviewing pleasure products, hiking with her border collie, or recording episodes of the podcast she co-hosts called Bad In Bed. Follow her on Instagram @Gabriellekassel.