
Whether it’s in your hips, hamstrings, or all in your head, tension has a way of accumulating as we hustle through the day-to-day. But there are ways to reclaim some very necessary “me” time with just a few simple steps. Restorative yoga prioritizes stillness, relaxation, and a calmer state of mind, even more so than more traditional forms of yoga
Practicing “active relaxation” or gentle yoga (as it’s also known) can also help yogis hold poses longer than they normally would, giving weary muscles and connective tissues and little extra TLC. The silver lining: There’s room for restorative poses in even the tightest of places. Just remember to take the time to get in and out of each pose safely—especially when the spine is involved. And for those with injuries, be sure to move through each posture with a pro before trying them on your own.
Greatist Expert and yoga instructor Rebecca Pacheco suggests starting off with these six postures, from the hip-opening half-pigeon pose to the oh-so-restorative legs-up-the-wall pose. So find a quiet spot—and a few uninterrupted minutes—and get ready to relax.
Disclaimer: While we’re big fans of yoga to ease tension and improve mobility, it’s not a replacement for medical care. If you’re experiencing chronic pain or injury, please consult a qualified professional.
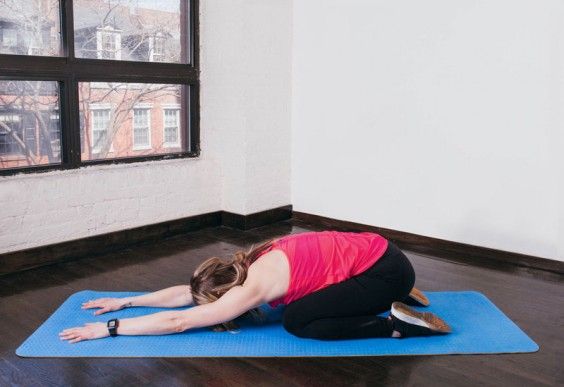
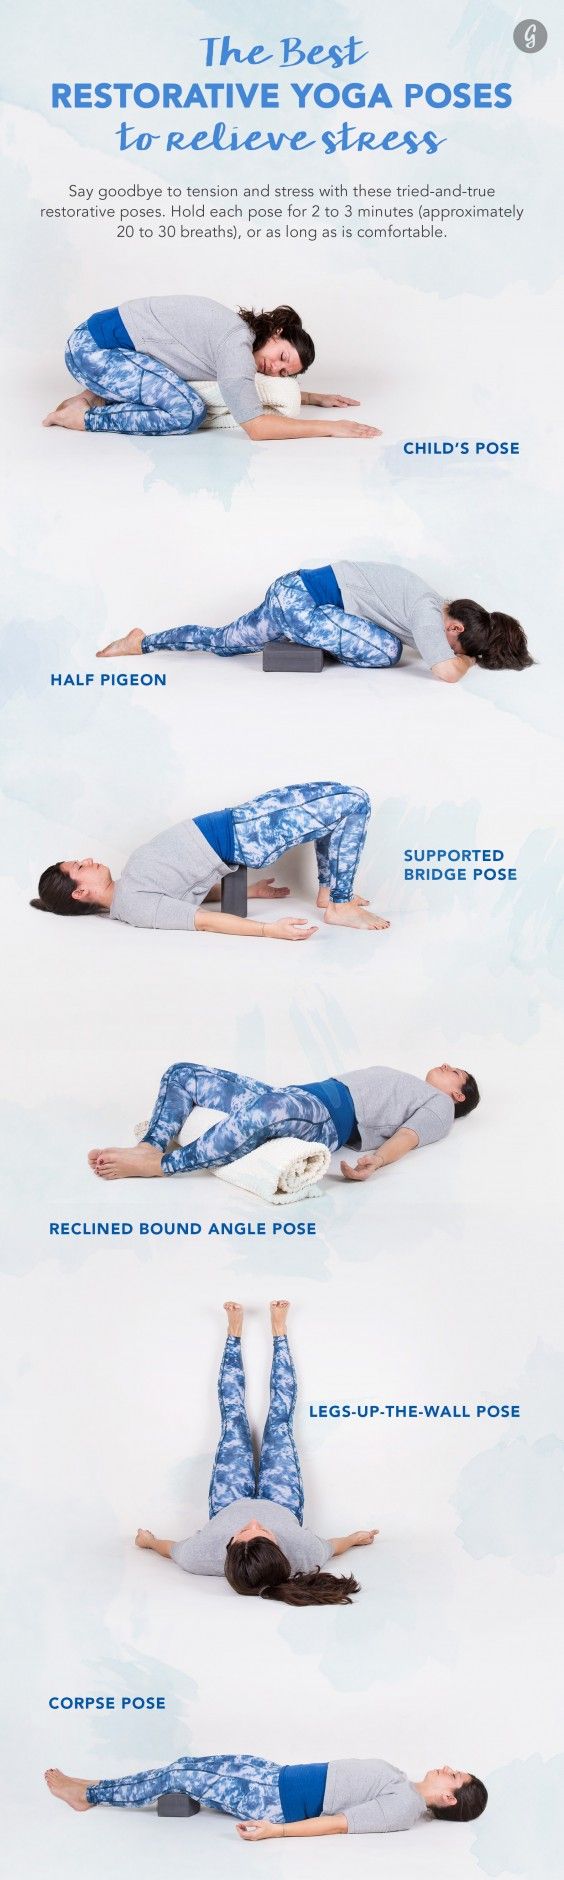
Child’s Pose
Balasana
Create a support of firm pillows, blankets, or a bolster lengthwise in front of you. Lower onto your knees, placing them on either side of the support, toes together. Fold your upper body over the length of the support. Rest your forearms on the floor along the support, and turn to one side (or rest your forehead on the support—whatever is most comfortable). Let gravity pull your legs toward the earth as you soften the lower back, and release the tailbone toward the heels. Halfway through, turn your head to the other side as the body continues to settle into the pose.
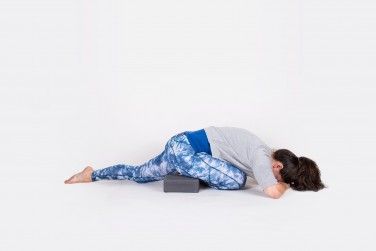
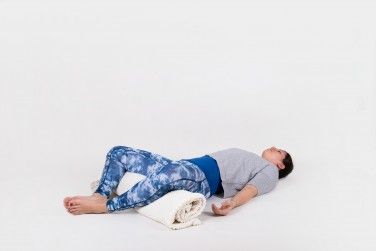
Half-Pigeon Pose
Eka Pada Rajakapotasana
Start on all fours and slide your right knee forward toward your right hand. Lower your right hip onto a bolster, pillow, or folded blanket as you extend your left leg back, toes pointed. Remain upright using hands to support you, or lower down to forearms. Breathe into the pose as you inch your right shin closer to the mat. Carefully come up to downward-facing dog, then lower onto your left hip to repeat on other side.
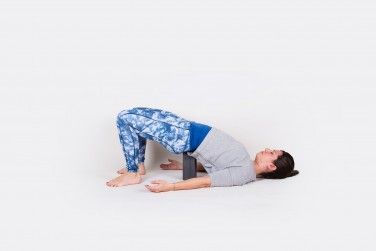
Supported Bridge Pose
Setu Bandha Sarvangasana
Lie on your back with your knees bent, feet planted flat on the floor, hip-distance apart. Extend your arms by your sides and roll your shoulder blades in toward one another to feel a slight lift in the chest. Carefully lift your hips off the ground and slide a yoga block directly under your sacrum, the large, triangular bone at the base of your spine. (Note: Always come into bridge pose before you place the block under your sacrum—don’t try to lie directly on the block.)As you rest here, arms can remain by your sides, stretched overhead, or straight out in a T-shape. Beginners can keep the block at its lowest height, then rotate it for a higher lift. To come out of the pose, press down into your feet and lift your hips. Remove the block and gently lower back to the floor.
Reclining Bound Angle Pose
Supta Baddha Konasana
Lie on your back with the soles of your feet together, knees pointing outward, and slide heels as close to the groin as is comfortable. Place your arms at 45-degree angles to your torso with the palms facing up, or place one hand on your low belly and one on your chest to help focus on the breath.With each exhale, let your knees float toward the ground, creating a stretch across the inner thighs and groin. If the stretch is too deep, place additional blankets or cushions under your knees for support. To come out of the pose, gently roll to your right side with knees drawn to your heart, and gradually prop yourself up to sitting.
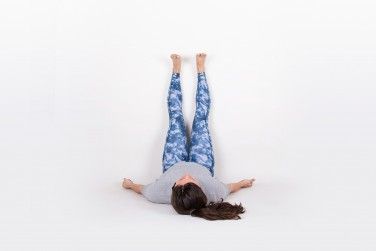
Legs-up-the-Wall Pose
Viparita Karani
To perform this passive inversion, start seated on the floor with your right shoulder, hip, and thigh against a wall. Keep a bolster within reach, and exhale as you lower your back while swinging your legs up onto the wall. Press the soles of your feet into the wall, lift your hips, and slide the bolster underneath your hips. Extend arms out to the sides or in cactus (upper arms perpendicular to torso, elbows bent at 90 degrees, palms facing up). Place a small roll (like a rolled-up towel) under your neck if extra support is needed. Rest passively.When ready, press soles of your feet against the wall and lift your hips to slide the bolster out from under you. Gently lower your pelvis to the floor, roll to the right side, and use your hand to press yourself back up to sitting.
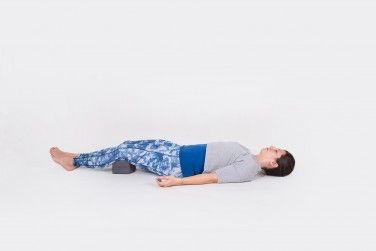
Corpse Pose
Savasana
Seated on the floor with legs slightly bent, slide a bolster beneath your knees and slowly lower your back, neck, then head onto the floor. Let your arms rest comfortably by your sides, palms facing the sky. Close your eyes, become aware of your natural breath, and let go. When ready to come out of the pose, roll onto your right side, take 2 to 3 breaths, and gently press your hands into the ground to lift you back to sitting.